Open Floating Tenon Joinery - gerald@eberhardt.bz
Open Floating Tenon Joinery - gerald@eberhardt.bz
Open Floating Tenon Joinery - gerald@eberhardt.bz

You also want an ePaper? Increase the reach of your titles
YUMPU automatically turns print PDFs into web optimized ePapers that Google loves.
MASTER TECHNIQUES<br />
<strong>Open</strong> <strong>Floating</strong><br />
<strong>Tenon</strong> <strong>Joinery</strong><br />
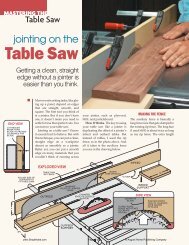
Mortise and tenon joinery made easy.<br />
All it takes is a single router table setup.<br />
Round over one<br />
edge and end of<br />
tenon for a snug fit<br />
When I’m building large frame and panel assemblies<br />
or doors, I turn to traditional mortise and<br />
tenon joinery for long-lasting strength. But for<br />
smaller work, I like to use a modified mortise and<br />
tenon joint. This floating-tenon provides a lot of<br />
strength and is quick to make at the router table.<br />
<strong>Floating</strong><br />
tenon<br />
Mortise<br />
depth equals<br />
bit height<br />
1<br />
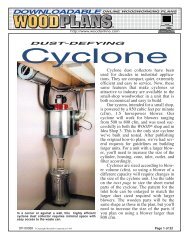
In a traditional mortise and tenon joint, you need<br />
one setup for the mortises and another for the tenons<br />
— which can be time-consuming. To streamline the<br />
process, I rout an identical mortise in each mating<br />
piece and join the parts with a “floating” tenon. This<br />
means you only have one setup for the mortises.<br />
Chamfer<br />
stop block<br />
for dust<br />
relief<br />
Workpiece<br />
Mortises in<br />
rails and stiles<br />
are identical<br />
Stile<br />
Stop<br />
block<br />
Set bit to maximum<br />
cutting height<br />
Notch spacers to<br />
wrap around bit<br />
Rail<br />
Length of<br />
mortise<br />
matches<br />
depth<br />
NOTE: Cut<br />
grooves for<br />
panel after<br />
making<br />
mortises<br />
Remove spacers<br />
to increase<br />
cutting depth<br />
a. b.<br />
Final pass made<br />
with no spacers<br />
Spacers make<br />
routing in several<br />
passes a snap<br />
www.ShopNotes.com Page 2 of 3 ©August Home Publishing Company
ROUTING MORTISES<br />
With an idea of how the joint works, you’re ready to<br />
get set up and start routing. All you need is a regular<br />
1 ⁄ 4"-dia. straight bit (for 3 ⁄ 4"-thick stock).<br />
SETTING UP. Figure 1 shows a good overview of the<br />
router table setup. But details are left to point out.<br />
First, the bit needs to be centered on the workpiece.<br />
This way, the mating pieces will be flush.<br />
Take a look at the box below to see how I did this.<br />
Next, you can set the bit height. For the largest (and<br />
strongest) joint, set the bit to its full cutting length.<br />
SPACERS. But making a full-depth cut like this puts<br />
a lot of stress on the bit and router motor. So I limit<br />
each cut to 1 ⁄ 4" deep and make multiple passes.<br />
The problem here is having to reach under the<br />
table to adjust the height of the router. This is timeconsuming<br />
and can lead to a “stepped” mortise<br />
where the sides aren’t even. Instead, I rely on a set<br />
of 1 ⁄ 4" hardboard spacers. You increase the depth of<br />
cut simply by removing a spacer (Figure 1a).<br />
STOP BLOCK. Next, clamp a stop block to the router<br />
table fence. This way you’ll get identical mortises<br />
in every part. To get the strongest joint, set the stop<br />
block to rout a mortise that matches the bit height.<br />
START ROUTING. Now you can turn on the router and<br />
start making mortises. All the parts are routed the<br />
same way, so you can do this assembly-line style.<br />
FLOATING TENONS<br />
With all the mortises routed, you can move on to<br />
the floating tenons. Using contrasting wood will<br />
“show-off” the tenon (like in the main photo).<br />
SIZING TENON STOCK. To make it easier to work on the<br />
tenons, I do most of the shaping on an oversize<br />
blank. It’s sized for a slip fit in the mortises to make<br />
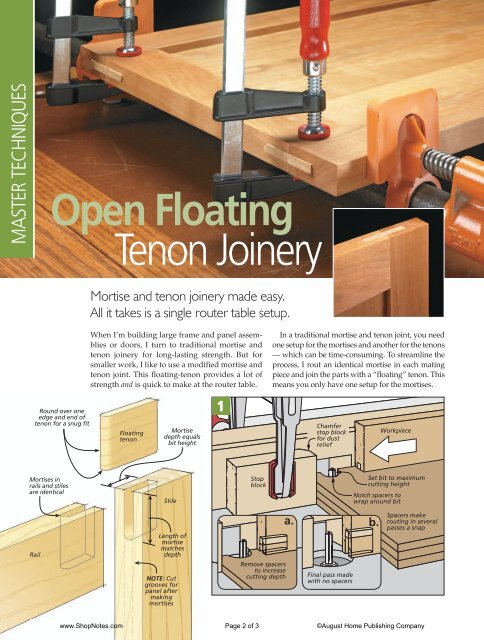
Centering the Router Bit<br />
Your goal in making a frame and panel assembly<br />
is to have the mating parts fit flush. In order to do<br />
that, the router bit needs to be accurately centered<br />
on the workpiece. Here’s an easy, no-measure way.<br />
Start by “eyeballing” the bit as close to the<br />
center of a short test piece as possible and a hair<br />
toward the outside edge, like you see in Figure 1.<br />
Now, make a pass, flip the workpiece end for end,<br />
and make a second pass (Figure 2). This creates a<br />
groove that’s slightly wider than the bit.<br />
To center the bit, gently nudge the fence closer<br />
to the bit and make a set of passes on a new test<br />
piece. It may take a few tries. You’ll know the<br />
router bit is dead center when it doesn’t remove<br />
any additional material on the second pass.<br />
2 3<br />
Backer<br />
prevents<br />
chipout<br />
!/8"<br />
roundover<br />
bit<br />
Fence<br />
SECOND: Round<br />
over one end<br />
<strong>Floating</strong> tenon<br />
blank<br />
FIRST: Round<br />
over one long<br />
edge of blank<br />
Flip workpiece<br />
over for<br />
second pass<br />
FIRST: Adjust fence<br />
so bit is just off center<br />
to workpiece<br />
a.<br />
NOTE: Bit<br />
should be<br />
a “hair” to<br />
outside to<br />
prevent<br />
backrouting<br />
<strong>Floating</strong><br />
tenon blank<br />
assembly easier. I also cut it extra wide so I can trim<br />
the tenons flush after the frame is glued up.<br />
Making the tenons involves a little “two-step”<br />
between the router table and table saw. After rounding<br />
over one long edge, you’ll round over one end of<br />
the tenon blank, as in Figure 2. This way the tenon<br />
will seat tightly in the mortise. Then cut the tenons<br />
to length at the table saw. I clamped a stop block to<br />
the rip fence to size them identically (Figure 3).<br />
PANEL GROOVE. Now that the joinery is complete, you<br />
can cut the grooves to hold a panel, if necessary.<br />
ASSEMBLY. Finally, to assemble the frame, clamp it<br />
up like you see in the main photo. A pipe clamp<br />
pulls the joint together and a second clamp keeps<br />
it aligned. When the clamps come off, you can trim<br />
the tenons flush with a chisel and sandpaper.<br />
1 2<br />
a. a.<br />
Clamp stop<br />
block to<br />
rip fence<br />
THIRD:<br />
Cut tenon<br />
to length<br />
NOTE: Repeat<br />
steps until bit<br />
is centered<br />
SECOND:<br />
Rout one pass,<br />
THIRD: flip workpiece, and<br />
Adjust fence rout another pass<br />
toward bit and<br />
rout two passes<br />
with new test piece<br />
www.ShopNotes.com Page 3 of 3 ©August Home Publishing Company