Mortise and Tenon: A Primer - Woodworker's Journal
Mortise and Tenon: A Primer - Woodworker's Journal
Mortise and Tenon: A Primer - Woodworker's Journal

You also want an ePaper? Increase the reach of your titles
YUMPU automatically turns print PDFs into web optimized ePapers that Google loves.
32<br />
<strong>Mortise</strong> <strong>and</strong> <strong>Tenon</strong>: A <strong>Primer</strong><br />
Joining long grain to end grain with mortise<br />
<strong>and</strong> tenon — the king of rail joints<br />
By Ian Kirby<br />
A<br />
mortise <strong>and</strong> tenon joint is<br />
nothing more than a square<br />
peg in a square hole. The joint<br />
is either stopped or through. The<br />
through joint is usually wedged,<br />
which makes it effectively a dovetail<br />
joint. Chances are there isn’t a house<br />
in the U.S.A. that doesn’t have<br />
examples of the joint somewhere in<br />
its furniture or built-in cabinets.<br />
In this article I’ll describe the<br />
three main ways the joint is used.<br />
Since the geometry of any design<br />
follows a certain set of conditions,<br />
it’s vital to underst<strong>and</strong> that aspect of<br />
the joint. I’ll also explain how to<br />
design for strength.<br />
Two-dimensional frames<br />
(doors, mirrors, wall panels)<br />
In a subsequent article I’ll put<br />
theory into practice by looking at<br />
ways the joint can be cut <strong>and</strong><br />
describe, through the making of<br />
a simple table, what you must do<br />
before <strong>and</strong> after cutting the joint.<br />
Although the basic joint is simple,<br />
its design details vary in complexity<br />
<strong>and</strong> sophistication according to<br />
the following circumstances: Do<br />
the two or three pieces being<br />
joined form the corner of a twodimensional<br />
frame, as in a door, or<br />
a three-dimensional frame, as in<br />
a table? Or, do they form a T-shape,<br />
as in a center rail? And finally, is the<br />
joint through or stopped?<br />
Three-dimensional frames<br />
(tables, chairs, beds)<br />
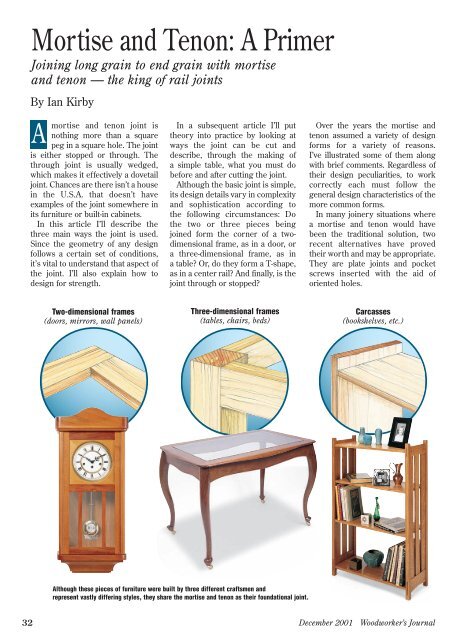
Although these pieces of furniture were built by three different craftsmen <strong>and</strong><br />
represent vastly differing styles, they share the mortise <strong>and</strong> tenon as their foundational joint.<br />
Over the years the mortise <strong>and</strong><br />
tenon assumed a variety of design<br />
forms for a variety of reasons.<br />
I’ve illustrated some of them along<br />
with brief comments. Regardless of<br />
their design peculiarities, to work<br />
correctly each must follow the<br />
general design characteristics of the<br />
more common forms.<br />
In many joinery situations where<br />
a mortise <strong>and</strong> tenon would have<br />
been the traditional solution, two<br />
recent alternatives have proved<br />
their worth <strong>and</strong> may be appropriate.<br />
They are plate joints <strong>and</strong> pocket<br />
screws inserted with the aid of<br />
oriented holes.<br />
Carcasses<br />
(bookshelves, etc.)<br />
December 2001 Woodworker’s <strong>Journal</strong>
Anatomy of Parts<br />
A key step to underst<strong>and</strong>ing<br />
mortise <strong>and</strong> tenon joinery is<br />
knowing the parts, many of which<br />
are derived from human anatomy.<br />
The specific name of the<br />
mortise/tenon piece depends upon<br />
its function <strong>and</strong> orientation. The<br />
mortise piece is usually the upright<br />
member, such as a stile, leg, or<br />
post. The tenon piece is usually<br />
horizontal, such as a rail, an apron,<br />
a stretcher, or a shelf.<br />
Dimensions of Parts<br />
A = <strong>Tenon</strong> length = <strong>Mortise</strong> depth<br />
On a stopped joint leave a gap<br />
between the end of the tenon <strong>and</strong><br />
the bottom of the mortise. The two<br />
parts don’t need to meet since the<br />
end grain of the tenon isn’t a gluing<br />
surface, <strong>and</strong> it’s easier to make if<br />
you leave a gap of about 1/16".<br />
B = <strong>Tenon</strong> width = <strong>Mortise</strong> length<br />
Make the tenon width to exact fit. If<br />
it’s too narrow, the tenon may float<br />
<strong>and</strong> position the rail in the wrong<br />
place. For the same reason, don’t<br />
crush the the edges of the tenon<br />
during assembly thinking you are<br />
making the joint tight. More likely<br />
you are causing misalignment. The<br />
end walls of the mortise are end<br />
grain <strong>and</strong> therefore not suitable<br />
gluing surfaces.<br />
Woodworker’s <strong>Journal</strong> December 2001<br />
<strong>Mortise</strong><br />
piece<br />
Stile<br />
End<br />
wall<br />
Bottom<br />
Cheeks<br />
B<br />
A<br />
C<br />
Defining the parts<br />
Side wall<br />
B<br />
C<br />
End<br />
C = <strong>Tenon</strong> thickness = <strong>Mortise</strong> width<br />
Make the tenon width to exact fit. If<br />
it’s too thin, it will likely float <strong>and</strong><br />
position the rail in the wrong place.<br />
You should be able to “push fit”<br />
the parts together. A “clamp fit”<br />
with squeaky resistance is too tight.<br />
Applying glue will swell an easy-fit<br />
joint much tighter. A too-tight joint<br />
might split when glue is added.<br />
Geometry of Parts<br />
Accurate joinery, whether cut by<br />
h<strong>and</strong> or machine, is defined by<br />
accurate geometry.<br />
Some authors recommend undercutting<br />
the shoulder to ensure<br />
a tight-fitting joint. My view is —<br />
don’t. First, what is undercut? 85°?<br />
70°? Second, how do you measure<br />
it? Third, if you can undercut<br />
consistently, its st<strong>and</strong>s to reason<br />
you can also cut square.<br />
Shoulders square to face<br />
side <strong>and</strong> other faces<br />
Faces aligned with stock,<br />
with no twist<br />
A = <strong>Tenon</strong> length = <strong>Mortise</strong> depth<br />
B = <strong>Tenon</strong> width = <strong>Mortise</strong> length<br />
C = <strong>Tenon</strong> thickness = <strong>Mortise</strong> width<br />
A<br />
Face<br />
Edge<br />
Cosmetic<br />
shoulder<br />
<strong>Tenon</strong><br />
piece<br />
Rail<br />
Structural<br />
shoulder<br />
The undercut shoulder presents<br />
an edge to the stile instead of a flat<br />
face. Clamp pressure easily pushes<br />
the edge into the stile, distorts the<br />
wood, <strong>and</strong> changes the between-theshoulders<br />
distance. Most important,<br />
you also lose the mechanical<br />
efficiency of a dead stop.<br />
<strong>Mortise</strong> <strong>and</strong> tenon joinery is<br />
subjected to two types of stress.<br />
One type arises from use, as when<br />
we lean back in a chair or push<br />
a table to a new location. The other<br />
type arises from wood movement.<br />
Wood shrinks <strong>and</strong> exp<strong>and</strong>s across<br />
the grain in response to changing<br />
humidity but not along its length.<br />
To cope with both types of stress,<br />
we design the joint to be as strong<br />
as possible. Since the configuration<br />
<strong>and</strong> section of the parts being<br />
joined are usually unique, we must<br />
design for the job at h<strong>and</strong> <strong>and</strong> that<br />
design is based on experience<br />
about what has worked before.<br />
End walls square to the<br />
face side <strong>and</strong> face edge<br />
Side walls parallel to each<br />
other <strong>and</strong> to face side
34<br />
Designing for strength<br />
Shoulders<br />
All tenons require shoulders. There<br />
are two types. Structural shoulders<br />
resist bending stress. Cosmetic<br />
shoulders hide the joint if the rail<br />
shrinks <strong>and</strong> they hide the gap<br />
presented by a damaged mortise<br />
end or a mortise made slightly<br />
long. Cosmetic shoulders need be<br />
only 1/8" to be effective.<br />
A tenon without a shoulder on<br />
one side is called a barefaced<br />
mortise <strong>and</strong> tenon. To keep it<br />
aligned at the glue-<strong>and</strong>-clamp stage<br />
requires purpose-made clamping<br />
blocks. I don’t recommend this<br />
configuration. If at all possible,<br />
reduce the thickness of the tenon to<br />
get a shoulder on each side.<br />
No shoulder<br />
on this face<br />
A tenon without a shoulder on one face of the<br />
stock, called a barefaced mortise <strong>and</strong> tenon,<br />
is not recommended. Try reducing the tenon<br />
thickness to get a shoulder on the bare side.<br />
<strong>Tenon</strong> Length, <strong>Mortise</strong> Depth<br />
If the tenon is too long, the joint is<br />
under greater stress due to wood<br />
movement. Too short, <strong>and</strong> it may<br />
fail due to too little glue surface. My<br />
compromise is to mortise about<br />
halfway into the stile. In narrow<br />
stock, go a bit more than halfway.<br />
Horn<br />
1/16"<br />
gap<br />
<strong>Tenon</strong> is<br />
too thin<br />
for<br />
typical use<br />
1 ⁄3 1 ⁄3<br />
1 ⁄3<br />
When a mortise is placed near the end of a stile,<br />
an extra inch of so of material is left to extend<br />
past the joint. This horn will be cut off later.<br />
<strong>Tenon</strong> Width, <strong>Mortise</strong> Length<br />
If a mortise extends too near to<br />
the end of the stile of a corner<br />
joint (often, exactly the spot<br />
where you simply need a joint to<br />
go), the stile may split. Therefore,<br />
make the tenon shoulder nearest<br />
the end of the stile one-quarter<br />
the total width of the<br />
tenon. To keep from<br />
splitting the mortise,<br />
an extra inch or so<br />
(called the horn) is<br />
left on the stile. Once<br />
the glue is cured <strong>and</strong><br />
the job is out of<br />
clamps, the horn is<br />
sawn off.<br />
When the mortise is<br />
not at the end of the<br />
stile, make the tenon<br />
the full width of the<br />
rail, less 1/8" at each<br />
edge for the cosmetic<br />
shoulder.<br />
Preferred<br />
machining<br />
of the<br />
joint<br />
3<br />
⁄16<br />
" 3<br />
⁄8<br />
" 3 "<br />
⁄16<br />
Make the tenon<br />
shoulder nearest<br />
the end of the stile<br />
1/4th the total<br />
width of the tenon.<br />
MORTISE & TENON RULES<br />
1. Hidden mortises should penetrate<br />
about halfway into a stile.<br />
2. Create Balanced joints.<br />
3. Structural shoulders resist stress.<br />
4. Cosmetic shoulders hide the joint.<br />
5. At the end of a stile, leave a horn.<br />
(to resist splitting)<br />
6. Don’t undercut.<br />
When joining two pieces of the same thickness,<br />
balancing the joint for strength amounts to<br />
making the thickness of the two cheeks added<br />
together equal the thickness of the tenon.<br />
<strong>Tenon</strong> Thickness, <strong>Mortise</strong> Width<br />
When joining two pieces of wood of<br />
the same thickness, divide the<br />
thickness roughly in half to create<br />
a balanced joint. For example, if the<br />
wood is 3/4" thick, make the tenon<br />
3/8" thick <strong>and</strong> each mortise cheek<br />
3/16" thick. Since each piece has an<br />
equal amount of tissue, each is<br />
equally able to resist stress <strong>and</strong> the<br />
joint is balanced.<br />
Loose-tenon Joint<br />
A slot mortiser is a machine that<br />
cuts a mortise into both rail <strong>and</strong><br />
stile. The two parts are connected<br />
with a third piece made to fit the<br />
slot, much like a biscuit joiner. This<br />
joint is called a loose mortise <strong>and</strong><br />
tenon. You can make the joint using<br />
a plunge router <strong>and</strong> a single bit,<br />
although you will normally need<br />
different jigs to manage the two<br />
parts. Once glued, the joint is just<br />
as strong as a conventional mortise<br />
<strong>and</strong> tenon.<br />
Floating <strong>Tenon</strong><br />
Loose tenon joints are the<br />
inspiration for latter-day biscuit<br />
joiners. Once glued in place they<br />
are as strong as a traditional<br />
mortise <strong>and</strong> tenon joint.<br />
December 2001 Woodworker’s <strong>Journal</strong>
Two-dimensional frames<br />
<strong>Mortise</strong><br />
& <strong>Tenon</strong><br />
Variations<br />
Nearly as soon<br />
as there were<br />
woodworkers, the mortise<br />
<strong>and</strong> tenon joint was<br />
created — an efficient<br />
<strong>and</strong> elegant way to join<br />
solid wood. Variety being<br />
the spice of life <strong>and</strong> the<br />
essence of creativity,<br />
many kinds of mortise<br />
<strong>and</strong> tenon joints became<br />
common. Due to advances<br />
in machinery, adhesives,<br />
<strong>and</strong> techniques, the<br />
mortise <strong>and</strong> tenon<br />
variations illustrated here<br />
are seldom used today.<br />
Long<br />
<strong>and</strong> short<br />
shoulder<br />
mortise<br />
<strong>and</strong> tenon<br />
Frame <strong>and</strong> Panel<br />
Two-dimensional frames with a solid panel<br />
trapped in a groove make a classic frame<br />
<strong>and</strong> panel. This ingenious construction is<br />
not only the foundation of furniture<br />
making, it remains the only method we<br />
have for making a dimensionally stable<br />
frame from dimensionally unstable solid<br />
wood. The traditional example is, of course,<br />
the frame <strong>and</strong> panel door. Although with<br />
modern material this door is no longer the<br />
most efficient design available, tradition<br />
<strong>and</strong> a sense of history continue to drive the<br />
popularity of this beautiful cabinet staple.<br />
Used in multiples, we can make larger<br />
frames, which, joined at the corners, make<br />
storage chests <strong>and</strong> cabinets.<br />
Haunch<br />
mortise <strong>and</strong><br />
tenon<br />
1<br />
⁄4<br />
A stile turned 90˚ to<br />
the rail provides the<br />
greatest resistance to<br />
stress. Typically the<br />
through tenon in that<br />
situation will be 1/4th<br />
the width of the rail.<br />
Fox tail wedge<br />
mortise <strong>and</strong><br />
tenon<br />
As the rail is driven<br />
home, the wedges<br />
exp<strong>and</strong> the tails.<br />
In the days of h<strong>and</strong> tool<br />
woodworking, grooves<br />
were made using a plow<br />
plane. Because you can’t<br />
make a stopped groove<br />
with a plow plane, the<br />
haunch was left on the<br />
tenon to fill the groove.<br />
If the frame was to be<br />
fitted with a glass panel<br />
sitting in a rabbet, then<br />
the long <strong>and</strong> short joint<br />
was used.<br />
The author has<br />
made many fox<br />
tail joints but<br />
never used one in<br />
furniture! You only<br />
get one shot at<br />
glue-up. It’s<br />
a clever concept,<br />
but there’s no<br />
place in furniture<br />
where it’s really<br />
necessary.<br />
MORTISE & TENON RULES<br />
7. The completed joint<br />
should slide together with<br />
moderate h<strong>and</strong> pressure.<br />
8. Accurate geometry is the<br />
key to effective joinery.<br />
9. With stopped tenons,<br />
always cut them 1/16"<br />
short of the end wall.<br />
10. Use a sufficient amount<br />
of glue on the joints (but<br />
avoid over gluing.)<br />
A middle rail A top rail<br />
Balanced<br />
cosmetic<br />
shoulders<br />
<strong>Mortise</strong> <strong>and</strong> tenons <strong>and</strong> the flat<br />
panels easily created by them have<br />
long been the building blocks of solid<br />
wood construction. Adjust the<br />
position of the tenon at the end of<br />
the rail to logically suit the location<br />
of the rail in the panel.<br />
Sloping<br />
haunch<br />
mortise<br />
<strong>and</strong> tenon<br />
Pegged<br />
mortise<br />
<strong>and</strong> tenon<br />
By slightly offsetting<br />
the through tenon, you<br />
can reduce your<br />
chances of splitting<br />
the stile <strong>and</strong> add<br />
stability to the joint.<br />
Shoulder<br />
is offset<br />
from top<br />
of joint<br />
to avoid<br />
splitting.<br />
On a threedimensional<br />
frame,<br />
there is no need for<br />
a groove. The notion<br />
of a haunch,<br />
however, remained.<br />
A sloping haunch<br />
satisfies the<br />
psychological need<br />
for a haunch <strong>and</strong><br />
the visual need for<br />
a flush shoulder line<br />
at the top edge.<br />
Draw pegging<br />
is a technique<br />
derived from<br />
timber frame<br />
construction. It’s<br />
unnecessary with<br />
modern glues <strong>and</strong><br />
correctly made<br />
joints, but if you<br />
like the look, add<br />
the pegs after<br />
the joint is made.<br />
Woodworker’s <strong>Journal</strong> December 2001 35
Tables, chairs<br />
<strong>and</strong> other<br />
pieces of<br />
furniture are<br />
created from<br />
mortise <strong>and</strong><br />
tenon joints<br />
constructed<br />
in three<br />
dimensions.<br />
36<br />
Three-dimensional frames are<br />
used to make table bases, chairs,<br />
<strong>and</strong> the skeletons of large cases.<br />
Three members generally connect,<br />
for example, a table leg <strong>and</strong> two rails<br />
or aprons. In most situations the<br />
vertical leg is more or less square in<br />
section, while the incoming rails are<br />
flat. Factors affecting the design of<br />
the joint include the width <strong>and</strong><br />
thickness of the rails, the exact<br />
location of the rails on the faces of<br />
the leg, <strong>and</strong> complications caused<br />
by drawers or doors.<br />
Underframes impart stability<br />
to a piece of furniture. On this one<br />
the design not only includes twin<br />
tenons, but wedged tenons as well.<br />
Three-dimensional frames<br />
Inset Rails<br />
Flush Rails<br />
Centered<br />
Rails<br />
The illustrations above show<br />
the rail in three different place on<br />
the leg. Once the joint is glued, the<br />
“flush rail” must be made dead<br />
flush by planing — a manufacturing<br />
detail unnecessary with the inset<br />
rail. However, the strongest reason<br />
to inset the rail is visual: the change<br />
in level, along with the associated<br />
highlights <strong>and</strong> shadows, emphasizes<br />
the vertical element of the leg.<br />
Leg<br />
Stretcher<br />
Crossbar<br />
With three<br />
dimensional frame<br />
construction,<br />
design<br />
considerations<br />
become almost<br />
infinitely variable.<br />
Regardless of how<br />
the joint is<br />
employed to<br />
create a pleasing<br />
appearance, the<br />
rules of mortise<br />
<strong>and</strong> tenon joinery<br />
must be observed.<br />
Note that the thickness of the<br />
tenon is increased as it is inset while<br />
the gluing area decreases. In each<br />
case the tenon is mitered in the<br />
middle of the joint. Provided the<br />
tenons don’t touch, you can make<br />
the gap as small as you like. The<br />
1/8" inside shoulder on the flush<br />
<strong>and</strong> inset rail is enough to do the job.<br />
Underframes<br />
Underframes impart stability to<br />
a piece of furniture by bracing the<br />
structure. They often do double<br />
duty as supports for shelves.<br />
Where two underframe members<br />
meet at a T-shaped junction, you<br />
can increase the gluing area by<br />
using twin tenons. If the joint is<br />
made through <strong>and</strong> wedged, it offers<br />
an attractive design detail.<br />
Twin <strong>Tenon</strong>s<br />
When the rail is thicker than 1", you<br />
can increase the gluing area by<br />
making twin tenons side by side.<br />
The total thickness of the two<br />
tenons is about the same as for<br />
a single tenon, but the doubled<br />
gluing area makes for a potentially<br />
stronger joint. The figure below<br />
shows typical proportions: the<br />
minimum thickness of each tenon<br />
is about 3/16", <strong>and</strong> the space<br />
between should be about equal the<br />
tenon thickness. Twin tenons are<br />
often used this way in chair making<br />
where a back rail joins a legs.<br />
Thicker stock offers the possibility of creating<br />
twin tenons. The key advantage to this<br />
modification is you nearly double the glue area.<br />
December 2001 Woodworker’s <strong>Journal</strong>
Short twin tenons also occur in<br />
carcass sides, where a partition ties<br />
the case together <strong>and</strong> also acts as<br />
a shelf. Make the housing (also<br />
known as a dado) about 1/8" deep<br />
between the mortises. A housing<br />
between tenons not only makes the<br />
shelf able to bear a heavy load, but<br />
it also flattens any cup in the two<br />
boards. Because the tenons would<br />
otherwise be very short, they are<br />
usually made through <strong>and</strong> wedged.<br />
Because of the 1/8" deep housing,<br />
a 1/2" thick tenon is plenty big.<br />
Stop<br />
short by<br />
1/4".<br />
Gradient<br />
1 = 8<br />
Wedge is 1/8"<br />
longer than<br />
the kerf.<br />
A through-wedged mortise <strong>and</strong> tenon dem<strong>and</strong>s<br />
precision joinery. The wedge must thrust the<br />
stock against the end grain of the mortise.<br />
Place it the other way <strong>and</strong> you’ll split the wood.<br />
Gluing <strong>and</strong> Clamping<br />
A simple yet elegant idea like the<br />
mortise <strong>and</strong> tenon joint can go<br />
wrong at the last moment. In a later<br />
article, I’ll go through the basics of<br />
gluing <strong>and</strong> clamping. But for now<br />
I must simply say that incorrectly<br />
applied clamps <strong>and</strong> their critically<br />
important clamping blocks, or<br />
cauls, will ruin the best crafted<br />
joints in short order. So do not give<br />
short shrift to this last step in<br />
making a joint.<br />
With these few concepts in mind,<br />
it’s time to go to your shop <strong>and</strong> join<br />
some wood. Good cutting!<br />
Carcasses<br />
MORTISE & TENON RULES<br />
11. Don’t think you can make accurate<br />
mortises by drilling the waste away<br />
<strong>and</strong> “cleaning up” with a chisel. If you<br />
don’t form your mortises entirely by<br />
h<strong>and</strong>, try these easy to follow<br />
steps.<br />
Ian’s recommended process:<br />
a. After marking the joint, use an<br />
appropriate drill bit to<br />
carefully remove most of<br />
the waste.<br />
b. Use a plunge router <strong>and</strong><br />
a router jig to further<br />
machine the mortise.<br />
This will give you parallel<br />
walls square to your<br />
work piece.<br />
c. Pare the corners<br />
square <strong>and</strong> true with<br />
a sharp chisel.<br />
One place where through mortise <strong>and</strong><br />
tenons, <strong>and</strong> particularly twin tenons, occur<br />
regularly is in projects such as a bookcase.<br />
The through tenons are both structurally<br />
integral <strong>and</strong> visually beautiful. An additional<br />
joinery technique that the author regularly<br />
employs is a conjoined housing (or a dado<br />
here in America). The 1/8" deep dado<br />
shown between the mortises increases<br />
the weight-bearing capabilities of the shelf<br />
<strong>and</strong> flattens any cupping in the shelf <strong>and</strong><br />
upright pieces. It also presents a clean<br />
<strong>and</strong> subtle joint line.<br />
In this example, the author recommends a shallow<br />
dado stretching between the through mortises.<br />
Woodworker’s <strong>Journal</strong> December 2001 37