
New
#31
@jumanji, Fifth window and i can't find my External HDD Recovery Folder in the selection menu...It only shows the contents of C: Drive..
Hi, hold on. Quit PhotoRec.
1. Are you in USA?
2. Is the local time shown correct?
3. We have to first fix up a time suitable for both of us to be online.
4. Do not keep on posting the screenshots one after the other. Post only one ccreenshot asked for and then wait till I instruct you to go to the next screen.
It is already past midnight and I am going to sleep now.
First post a screenshot of Windows Disk Managemnt showing your system drive and the external drive. I shall be able to see it only tomorrow 1300hrs that is twelve hours from now. We shall start PhotoRec after that.
OK fine you are at GMT+3 and I am at GMT+5:30. Please change your time zone in USER CP. Settings &options>Edit Options> Date and Time options. Change Time Zone to GMT+3. That should show your correct Local Time in your post ( and I need not deduct 2:30 from my local time to get your local time. I am weak in mathematics)
Your TestDisk screenshots appear to be OK but I shall rework it and present it when I get back. ( I have an appointment with the optholmologist for my wife and running away now)
Last edited by jumanji; 21 Feb 2017 at 05:58.
I returned late and yet to do my workout. I shall return soon when I complete it.
OK, the worksheet for you is ready. I still can't say what will be the final result. Our friend Bongolia in this thread Flash files restored but with generic names. Partition notfound. was able to get all the files using PhotoRec ( but without the folder structure and original file names) but was able to get the folder structure and original filenames using the free demo version of GetDataback simple. In your case using GetDataback simple is out of consideration since you have formatted D:.If data is still there PhotoRec will definitely reconstruct the files. Let us see your luck.
Run PhotoRec with your destination external drive plugged in.
Screen 1:
Highlight/Select your formatted drive. Note the drive letter of your destination external drive.( In your case it may be different) [Proceed] is highlighted. Press Enter key
Screen 2:
Your drive D: partition P NTFS is highlighted. Move the highlight from [Search] to [File Opt]. Enter
Screen 3:
Toggle s to select/deselect all file types. If you know what file types you want to copy, you can deselect all types and select/highlight only those file types by putting X in [ ]. PhotoRec Scan will take less time. If you don't mind a long run, then select all file types. 300 GB will take quite a few hours.
Press b to save the selection. Do not forget
Screen 4:
Settings Saved. Press Enter.
Screen 5:
[Quit] is highlighted. Press Enter to return to the main menu.
Screen 6:
Back to the main menu with Drive D: Partiton P NTFS highlighted.
Move highlight from [File Opt] to [Search] Press Enter.
Screen 7:
Highlight [Other] Press Enter.
Screen 8:
Highlight [Whole] Press Enter
Screen 9:
Select Destination: Default shown Directory ; \testdisk7-0. No No No We want Directory I: /Recovery
Press Left arrow key to go one level higher. EDITED: It is not the right arrow key but left arrow key
Screen 10:
You are at Directory C: \ Still a No No
Press Left arrow key once again EDITED : Again Left arrow key
So you will press the left arrow key twice.
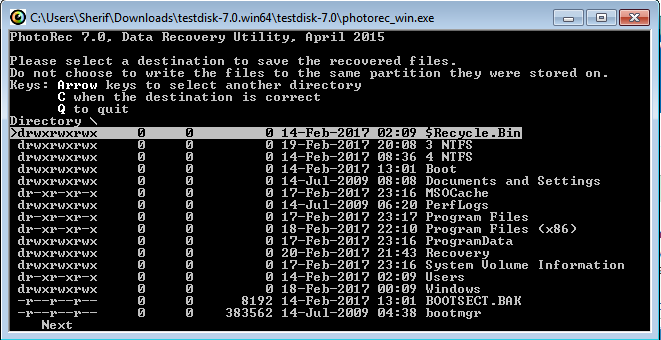
Screen 11:
Voila! you see all the directories (drives) . Move the highlight to the drive letter of your external drive - which you noted in screen one.
Press Enter.
Screen 12:
You are still in Directory I: \ that is the root. You got it. You can see all the folders on your external drive. Move the highlight to the Recovery Folder and press Enter
Screen 13:
Ahoy! you are in Directory I: \Recovery - your external drive Recovery Folder - your destination to copy
Why wait? Press C
Screen 14
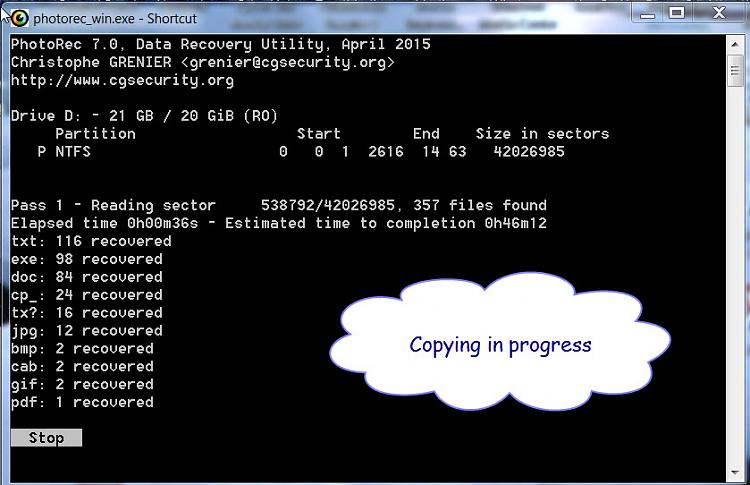
Copying starts
Screen15
Copy completed
Press Enter to quit.
Open the Recovery folder and check whether the files have been copied.
Let us know whether thumbs up or Thumbs down.
Last edited by jumanji; 21 Feb 2017 at 12:22.
Note: I have edited my previous post. In screen 9 and screen 10 you will press the left arrow key to move one level up and reach your destination.


 Quote
Quote


