
Related Manuals for Fairlight Xynergi

Summary of Contents for Fairlight Xynergi
- Page 1 Xynergi Media Production Centre User Manual 16 February 2010 Software Version 2.6 Issue 001...
-
Page 2: Important Notice
Important Notice The material in this document is copyright to Fairlight.AU Pty Ltd, and may not be quoted or reproduced in any form without written permission from the company. Fairlight is a trademark of Fairlight.AU Pty Ltd. All other trademarks are the property of their respective... -
Page 3: Table Of Contents
INTRODUCTION ......................11 Congratulations ........................11 Organising the Screens .......................11 What Else You Need to Know....................12 Anything Missing? .......................13 THE XYNERGI SYSTEM....................14 XYNERGI TACTILE CONTROLLER ................15 Monitor Section ........................15 Fixed Keys .........................17 Picture Keys ........................22 The Pad ..........................24 Soft Keys ...........................25 THE XPLAIN SYSTEM.................... - Page 4 Nudge ..........................122 Fade and Crossfade ......................123 Editing on Multiple Layers....................131 The Track Menu ....................... 131 Xynergi’s Quick Edit Layout....................133 Importing Clips from Other Projects ................... 135 Clip Level ......................... 136 Gating Clips........................137 Replacing Audio Media ...................... 138 Undo and Redo.........................
- Page 5 Selecting Tracks .......................172 Time Scale and Display Zooming ..................173 Audio Scrollers........................176 Transport Controls ......................178 Jog Commands......................... 178 Shuttle..........................178 CLIP EQUALISATION ....................180 Introduction ........................180 EQ display........................180 SCREEN MIX CONTROLS ..................184 The Mixer Screen......................184 Mouse Control in the Mixer Screen ..................
- Page 6 Revealing the Project File ....................250 Backup Files ........................250 Automatic File Saving......................250 Undo Files........................251 Video Files ........................252 Typical Xynergi Drive Configuration ..................252 Designating Media Device....................252 Creating New Projects ....................... 253 Backup Project to Folder....................253 Media Scanning ........................ 254 Detailed Media Management....................
- Page 7 PLUG-INS AND REWIRE .................... 270 Introduction ........................270 General Capabilities ......................270 VST and VSTi ........................270 Using VST Effects in Xynergi ....................271 Automation of Plug-ins ......................273 Controlling Plug-ins on Screen.................... 273 Controlling Plug-ins on the Surface..................275 Plug-ins on Faders ......................275 Plug-ins in the Pad......................277...
- Page 8 Putting Machines Online ....................310 Editing with Machine Control....................311...
-
Page 9: Introduction
This section is a reduced version of the Xynergi Fold-Out, a large printed picture that is included in the Xynergi package. It’s a good idea to keep it by you while you’re learning the system. Once it gets too tattered to read, you probably don’t need it any more. -
Page 10: What Else You Need To Know
What?? Sorry, but this is one of the keys to speed in Xynergi. Many operations can be done two ways. Momentary means: Hold down a key to open a mode, do one thing in that mode, then let go the key to exit the mode and go back to where you were. -
Page 11: Anything Missing
Anything Missing? There are many topics that are not covered here. They are covered in the Xplain system on-board the Xynergi controller. In many cases that’s a much easier way to learn about them. For information about Xplain see page 26. -
Page 12: The Xynergi System
– see page 118. 8. Bus Format (mono, stereo, 5.1 etc) – see Mix Automation – see page 64. 9. Monitor Configuration sets up speakers for control room and studio – see page 41. Xynergi Media Production Centre Page 14... -
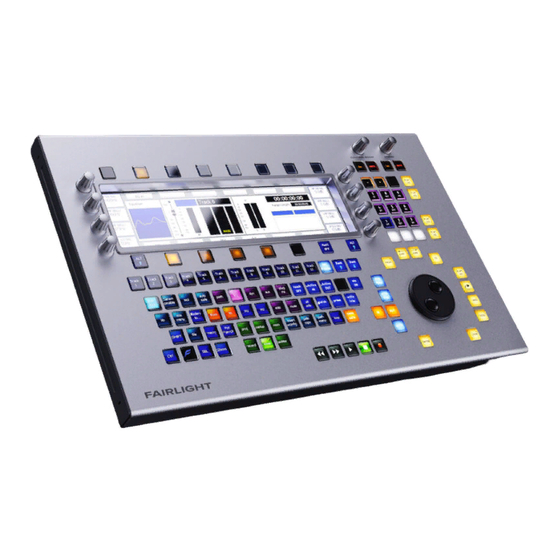
Page 13: Xynergi Tactile Controller
Control Room (CR) monitor level. To control how much the level is dimmed: Step 1 Stop the transport Step 2 Hold down the button Step 3 Turn the Jog Wheel. The level is shown in the Pad Xynergi Media Production Centre Page 15... - Page 14 Hold down the button Step 3 Turn the Jog Wheel. The level changes, and is shown in the Pad. Adjust to match the required SPL level. Step 4 Release the button Step 2 Release the BLUE Xynergi Media Production Centre Page 16...
-
Page 15: Fixed Keys
YNERGI ACTILE ONTROLLER Fixed Keys Fixed keys are “normal” switches with labels that do not change. Their functions change a little, but not as much as the picture keys. LEDs show function and status. Xynergi Media Production Centre Page 17... - Page 16 Macro key (see Chapter “Macros” page 208). These functions are described in detail in the Chapter “The Numpad” Type Numbers When naming channels, clips and other things, these keys type the large number written on them. Xynergi Media Production Centre Page 18...
- Page 17 Targets. These may be the next/previous clip head or tail (point), fade point and/or mark, or to a specific clip name. While the Jump key is held down, you may press a Numpad key ( etc) to jump by that many seconds. Xynergi Media Production Centre Page 19...
- Page 18 You can prevent part of this by changing a preference in the dialog. This is found in the menus at the top of Setup General Preferences the Edit Screen. Xynergi Media Production Centre Page 20...
- Page 19 Zooming in and out can also be done using the on your , when the Edit screen is in wheel mouse focus (if not, click somewhere on it). Simply pressing and releasing toggles between your last two zoom settings. Zoom Xynergi Media Production Centre Page 21...
-
Page 20: Picture Keys
Sometimes the same function appears on more than one megamode, because it is needed in both. In these cases the function always appears on the same button. See more about megamodes on page 42. Xynergi Media Production Centre Page 22... - Page 21 (Track 1, Live 1 etc), or a combination of system and user name. This is done in the Setup Megamode, using the button (a triggle that cycles through the three naming style styles). Xynergi Media Production Centre Page 23...
-
Page 22: The Pad
This displays all mixing information relating to the current path (the most-recently-selected path). It also displays the labels for the soft keys (see below). The ALT keys work with the Pad to extend its functionality. Xynergi Media Production Centre Page 24... -
Page 23: Soft Keys
The soft key label immediately above or below the soft key tells you what its current action will be, or shows its current status. To find out what any soft key will do at a particular time, hold down the button while Xplain pressing the soft key. Xynergi Media Production Centre Page 25... -
Page 24: The Xplain System
The Xplain System What is Xplain? Xplain is Xynergi’s built-in Help system. It’s great to use, because you don’t need to clutter your desktop with books like this one, and it gives you help about exactly where you are right now. -
Page 25: How To
User Manual … February 16, 2010 How To … In this chapter we will step through a number of common uses for a Xynergi Media Production Center. Note: these sequences are available through the system on the Xynergi Tactile Xplain Controller. - Page 26 Changes made with rotary knobs are applied relatively i.e. values amongst the signal paths remain different, but rise and fall together. But values “compress” when the reach upper or lower limits. This is demonstrated in the sequence that follows. Xynergi Media Production Centre Page 28...
- Page 27 This will remain the case while Multi stays ON. Take care with Multi. It's very powerful, but also quite dangerous! It’s a good idea to switch it off as soon as you’ve finished using it. Xynergi Media Production Centre Page 29...
- Page 28 Numpad keys with a label like etc. The number indicates how many tracks will be displayed. This time, press BLUE+ Now use the on your Xynergi controller to select a track that is not currently track buttons shown on the screen.
- Page 29 Plays from one second before clip head (on current track) Play Head Plays from one second before clip tail (on current track) Play Tail Plays from one second before clip fade out (on current track) Play Fade Xynergi Media Production Centre Page 31...
- Page 30 In other words, the transport backs up by the Preroll amount, then goes into Play. Alternative Transport Set For users more accustomed to earlier Fairlight products, an alternative transport layout can be chosen. To do this, press the button on the Setup Megamode.
- Page 31 Numeric Keypad for typing numbers, you must turn off. Using Marks Overview Xynergi allows you to create up to 100 timecode Marks, which are stored in the Project file. To create a mark, press the Mark button at any time. This will put a Mark at the current timecode position.
- Page 32 Just for now, turn the others off. Marks are now Mark your Jump Target. Release the button to locate to the next (or previous) mark in the project. Press the Jump Jump button a few more times to keep moving through the marks Xynergi Media Production Centre Page 34...
- Page 33 Other buttons/soft keys allow you to jump to the currently selected mark, or remove it from the list. Solo and Mute Xynergi has a number of ways to solo and mute. Briefly, here they are: Xynergi Surface Press the button in the...
- Page 34 When a channel is soloed, it works by muting all the other (unsoled) channels. Sometimes you want to prevent this e.g. when channels returning reverb or other signals that affect the sound of the current channel. Xynergi Media Production Centre Page 36...
- Page 35 To move channels from Solo to Mute: Step 1 Engage the Solo menu by either holding down the button, or pressing the Solo button and then the button Solo Menu Xynergi Media Production Centre Page 37...
- Page 36 SEL now also selected. These channels are the ONLY channels selected – if there were other channels selected before, they no longer are. To make your Muted channels also be the selected channels: Xynergi Media Production Centre Page 38...
- Page 37 AFL and PFL modes replace the current monitor source with a stereo solo bus whenever a feed is soloed. All soloed feeds are routed to the solo bus. Soloed link groups are automatically Xynergi Media Production Centre Page 39...
- Page 38 SIP Defeat is sometimes referred to as Solo Safe. Naming Inputs and Outputs Inputs and outputs are named outside the Xynergi application. This is because they are a permanent fixture in the studio, and it’s best to have their names in a separate file.
- Page 39 When you are choosing a name, it is advisable to use no more than two words of five characters each, including numbers. If you do, the complete name will be displayed on the Xynergi picture keys, making it easier for you to choose signal paths.
- Page 40 Megamodes Overview A megamode is a complete layout of the Xynergi picture keys. There are six megamodes, triggered by the green keys at the bottom of the controller. Here is a quick outline of the Megamodes Editor This is the main platform for audio editing.
-
Page 41: Recording
It will punch in from Play or Stop, and can punch out with gapless monitoring of playback. There are two recording modes, New and Tape Mode. The choice is made with a soft key in the Arm Menu. Xynergi Media Production Centre Page 43... - Page 42 Press the button to exit Patch and return to the Arm menu. Patch Note: Patching is used for all system connections between paths. Please see Patching Signal Paths on page 51 for more details. Xynergi Media Production Centre Page 44...
- Page 43 Press a Track button when the menu is displayed (in the Record Megamode). This track button should turn red Click the circular button next to a track number on the Edit screen. The button should turn red. Xynergi Media Production Centre Page 45...
- Page 44 When a track is armed, you can choose whether to listen to its input signal, its playback signal (REPRO), a switched combination, or nothing. soft key switches this function. Monitor This guide shows you how to set the Monitor setting, and tells you what the different settings do. Xynergi Media Production Centre Page 46...
- Page 45 If you would like to ensure that only one clip per track is created by recording, you can start by making a Tape. This means making a Tape Mode clip on each track. Start by pressing the soft key. Record NEW / Tape Xynergi Media Production Centre Page 47...
- Page 46 You can change the seedname for each track, and also set the starting number at any time. Get Ready Press the green button to access recording functions. The Arm menu will be Record Megamode automatically selected. Xynergi Media Production Centre Page 48...
- Page 47 Use the QWERTY keyboard to type the name, then press or click to finish. ENTER Note: If you select more than one clip, or more than one track in record, the affected clips will all get the same name. Xynergi Media Production Centre Page 49...
- Page 48 Get Ready Press the green button to access recording functions. Record Megamode inputs to a number of tracks, but don’t arm them yet (see How to Recording Patch Patch Inputs for details). Xynergi Media Production Centre Page 50...
-
Page 49: Patching Signal Paths
Patch dialog. This is accessed from the Record, Mixer or Setup Megamodes. To get there, press one of the green buttons with these labels. The Patch Dialog Press the button to display the Patch dialog. Patch Xynergi Media Production Centre Page 51... - Page 50 Destination categories Source Categories Categories of signal paths are selected in the lower part of the screen. Source categories Selecting a category of sources expands the category in the upper left of the screen. Xynergi Media Production Centre Page 52...
- Page 51 User Manual … February 16, 2010 In this case Analog Inputs have been selected. Destination Categories Destination categories Selecting a category of destinations expands it into the upper right of the screen. Xynergi Media Production Centre Page 53...
- Page 52 Select a source and a destination then click the Patch button in the center. Afterwards the tiles used in the patch will show the results. Source is always shown above destination. Source Source Destination Destination Xynergi Media Production Centre Page 54...
- Page 53 Pressing the Info button allows you to see more detail about specific tiles. To do this, press Info, then click on any tile. The system will show a box with information about the source and destination patching associated with that tile. Xynergi Media Production Centre Page 55...
-
Page 54: Reverse Patching
Press the green button. Editor Selection Press and release the button. Xynergi displays 48 tracks. Select the tracks to which you want to patch inputs. Patching Hold down the button. You can now see all the system buses, other than those with Set Source zero format, and below them, the four analog and four digital inputs from the SX-20. -
Page 55: Monitors
You can only choose speaker sets that have been defined i.e. given physical outputs. These sets have a dim light in their soft keys. To define more speaker sets, press the soft key and work on the Mixer Screen Config Monitors Xynergi Media Production Centre Page 57... - Page 56 Select all its Elements (Left, Center, Right etc) at the top left. Click Analog (or Digital) outputs at lower right. Choose the right number of free outputs to match the number of speakers. Click Patch Xynergi Media Production Centre Page 58...
- Page 57 This guide will show you how to choose a listening format. Get Ready Press the green button. Press the button. Format Setup Choose Format Select any of the formats shown on the . The system immediately switches to that soft keys format. Xynergi Media Production Centre Page 59...
- Page 58 The standard monitoring situation is: Main speakers, playing Main bus, listening to all appropriate speakers. You can choose an alternative speaker set, an alternative source, and/or an alternative listening format. This guide shows you how. Xynergi Media Production Centre Page 60...
-
Page 59: Setup
Use the pull-down menu to choose frame rate. Other fields include: Extn Frame Rate if you are using a video reference to drive your SX-20, set this field to the frame rate you are feeding it. Xynergi Media Production Centre Page 61... - Page 60 SX-20 S/P-DIF 1/2 synchronises to the S/P-DIF signal connected to inputs 1 and 2 at the rear of the SX-20. SX-20 S/P-DIF 3/4 synchronises to the S/P-DIF signal connected to inputs 3 and 4 at the rear of the SX-20 Xynergi Media Production Centre Page 62...
- Page 61 To exit the ADR dialog, choose another mode or megamode. See a later chapter on ADR for more details. Bus Format Overview Xynergi supports four types of buses (mix destinations) MAIN - the main bus. Can support any format from mono to 7.1. Cannot be turned off.
- Page 62 Assigning a path to a bus means sending it to that destination. Every path in the system has separate assignment to every bus, meaning that you can choose which paths go to which buses. Xynergi Media Production Centre Page 64...
- Page 63 (in the picture, Sub 1 is selected). Each path already assigned to that bus is highlighted (tracks 88 to 90 are highlighted). Each path shows the buses to which it is currently assigned. Xynergi Media Production Centre Page 65...
- Page 64 They are grayed out unless Main is the selected destination. Assigning Subs to Main (this picture is distorted to save space). Stem Assign Overview Sometimes it's necessary to assign a path part of a bus. Xynergi Media Production Centre Page 66...
- Page 65 > flashes. Pressing the soft key will make them the same. to reach more paths. Bank Tracks Lives Xynergi Media Production Centre Page 67...
- Page 66 Unlink and reassign unlinks the members. If the Link Group had a Boom member that was de- assigned from all other Bus Elements, it is reassigned to them. Alternatively you may use the soft keys change the defaults as explained in creation of Link Groups. Xynergi Media Production Centre Page 68...
- Page 67 This setting will be remembered for future sessions. Members of a Fader Group are indicated on the Main Screen graphics with the inclusion of fader group indicator, located immediately below the Track/Live channel number. Xynergi Media Production Centre Page 69...
- Page 68 Fader Group membership can be controlled globally using the Grouping Window. To open this, click on the Mixer screen and type SHIFT+ctrl+V To use this window: Step 1 Select a VCA group at the bottom of the window. Xynergi Media Production Centre Page 70...
- Page 69 Fader Group of the called channel. Zero means no Fader group membership. Calling a Group master To CALL a group master, click its fader on the Mixer Screen. If not visible, see Displaying Group Masters, above. Xynergi Media Production Centre Page 71...
-
Page 70: Files
Choose the DREAM II Project Type unless you are planning to interchange with owners of older Fairlight systems. Click to create the new project. Xynergi Media Production Centre Page 72... - Page 71 Use the mouse to navigate the Open dialog showing on the Edit Screen. Click OK when you have found the project you want. Or: select from the list of recently used files. Note: you can bypass the Xynergi controller and use the mouse directly, by clicking File Open above the Edit screen.
- Page 72 This guide shows you how to save automation data. Get Ready Press the green button. Mixer Press the button to display automation commands. Mix On Press the button to display the Mix File menu. file Xynergi Media Production Centre Page 74...
-
Page 73: Mixing
The Pad rotary controls are always available. To choose what type of controls are active, we must select the Edit Megamode, or the layout. For now, choose the Edit Megamode by pressing the green button. Editor Xynergi Media Production Centre Page 75... - Page 74 There are four modes for EQ. To switch, lower soft keys Mode 1. Bands 1 to 4 are shown, with Gain controls at the right and Frequency at the left. Mode 2. Bands 1 and 2 are shown in more detail. Xynergi Media Production Centre Page 76...
- Page 75 (except for buses, which have no Expander / Gate stage). To switch between modes, lower soft keys Mode 1. Compressor Mode 2. Expander / Gate. To toggle between Expander and Gate, soft key Dyn Type Mode 3. Limiter Xynergi Media Production Centre Page 77...
- Page 76 Select the destination path. Press one of the soft keys. Paste Library Overview Xynergi's library provides storage for groups of settings that you can recall at any time and apply to any signal path. Xynergi Media Production Centre Page 78...
- Page 77 Add to Fav soft key to display only this list. Fave Press the button at any time to toggle the Plug-ins editor Plug Ins You can select another path while the Insert Config layout is active. Xynergi Media Production Centre Page 79...
- Page 78 Overview Xynergi supports two types of external faders. 1. Fairlight Fader Side Car (12 faders). Xynergi will support up to two of these. 2. Mackie Control Extender Pro (8 faders). Xynergi will support one of these systems. Xynergi Media Production Centre...
- Page 79 MULTI is ON, all selected paths. Similarly, the Fader's Auto button puts this path into Automation Write, while the Xynergi Auto button does it for the most-recently-selected path, or, if MULTI is ON, all selected paths.
- Page 80 Fader Set, turn on the button (Numeric Keys glow violet or blue) and Fader Sets select a number from 1 to 9. If faders are properly configured using the Xynergi Configure application: Start All Programs Fairlight Xynergi...
-
Page 81: Automation
STOP during an automation pass. Press the soft key repeatedly to cycle through the options: the last value you wrote is ramped to the previous value of the parameter, using the Return Glide Out Time (see Utils menu) Xynergi Media Production Centre Page 83... - Page 82 . Enabled controls go into read. Stop Press twice to review what you have just written. Play Menu Press the soft key to remove the new automation data. Note: there is only one level of Undo Pass undo. Xynergi Media Production Centre Page 84...
- Page 83 Select one or more paths. If you are using Faders, use the Soft buttons (on a Fairlight Sidecar) or the SELECT buttons (on a Mackie). In this item we will deal with manual touch options. Please toggle the soft key OFF.
- Page 84 Select one or more paths. If you are using Faders, use the Soft buttons (on a Fairlight Sidecar) or the SELECT buttons (on a Mackie). Toggle the soft key ON.
- Page 85 Write Trim Locate to the desired point and press From Locate to the desired point and press Press and/or . They light up in red. Active IN Active Out Xynergi Media Production Centre Page 87...
- Page 86 Join Overview Join allows you to “carry” parameter values from one place to another. In brief: Write some data into the automation Locate to another timecode. Xynergi Media Production Centre Page 88...
- Page 87 In brief: Put paths into Preview Change the values of enabled parameters Make a range Press the soft key to write the new values over the range. fill range Xynergi Media Production Centre Page 89...
- Page 88 Buses to isolate. Press to return to the Mix menu exit Auto Safe Overview Auto Safe prevents signal paths from entering Write or Trim. Safe paths still Read their automation data, if any exists. Xynergi Media Production Centre Page 90...
-
Page 89: Automation Curves
Carry Over Automation Curves Automation data for tracks can be shown on the Edit Screen using the following command sequence: ViewSmart PaneAutomation, or by pressing the soft key in the Mix Menu. Curves Xynergi Media Production Centre Page 91... - Page 90 Select a parameter to be displayed using either the pull down menu Step 3 Click the Save button Step 4 Click a preset button Step 5 The system will request a name for the preset. You may use the suggested name or choose your own. Xynergi Media Production Centre Page 92...
- Page 91 For switched parameters like Mutes, the line is shown high when the channel is on, and low when it is muted, as shown below. When writing automation, the graph is shown in red. Existing automation data is shown in green, allowing you to target punch out points easily. Xynergi Media Production Centre Page 93...
- Page 92 Otherwise the values are held constant and shown with a horizontal line. While Events are displayed you may do any of the following: Move an individual event with the mouse. Xynergi Media Production Centre Page 94...
-
Page 93: Editing
To load it, consult the following Xplain item: How to Files Load Demo Get Ready Press the green button. Editor Press the button to access the menu. Press the key to turn it OFF. range Xynergi Media Production Centre Page 95... - Page 94 Instead, press the soft key. Now use the Numeric Keypad to type a timecode from point. time The numbers will be displayed over the Edit Screen. Now press to lock in your from point. Enter Xynergi Media Production Centre Page 96...
- Page 95 Get Ready Press the green button. Editor Operation Press the button. If the word slip is highlighted, press it again so that trim is highlighted. trim Xynergi Media Production Centre Page 97...
- Page 96 Most editing operations work on multiple tracks at the same time. All the clips parts of clips are affected. This guide will show you how to select tracks. Get Ready Press the green button. Editor Xynergi Media Production Centre Page 98...
- Page 97 The clip now fades from its beginning to the cursor position. Move fade head the transport a little to the right and press . These two commands are used to create fade tail most simple fades. Press (this will simplify the next step). UNDO Xynergi Media Production Centre Page 99...
- Page 98 Zoom. To increase your speed, practise using them with your left hand, while your right hand uses the Jog Wheel and the Clip, Head and Tail keys. Get Ready Press the green button. Editor Xynergi Media Production Centre Page 100...
- Page 99 You can do the cut clip cut clip same with copy slip trim These moves feel awkward at first, but remember your first mouse click-and-drag? With practise you'll become a virtuoso editor! Xynergi Media Production Centre Page 101...
-
Page 100: The Numpad
February 16, 2010 UMPAD The Numpad The Numpad, or Numeric Keypad, is the center of a great deal of Xynergi activity. This chapter explains how to use it, and gives more detail about its surrounding keys. Parameter Entry Often you need to enter a numerical value. This is normally terminated by pressing the Enter key. -
Page 101: Fader Sets
(see Using Marks in the How To Chapter, Basics section). Fader Sets When used with external faders (Fairlight Xe6, Sidecar or Mackie fader blocks) it allows different combinations of channels to have their faders mapped to the control surface. To activate a fader set (momentary mode):... -
Page 102: Meter Sets
Numpad To learn more about meters, please see the chapter Meters on page 202. Go To Used to quickly locate to either a Timecode position, a specific clip name or a stored Mark. Xynergi Media Production Centre Page 104... - Page 103 Mark Edit Megamode. You can press it at any time, in any transport mode. Marks are shown above the track display in the Edit Screen, as yellow pointers. Xynergi Media Production Centre Page 105...
- Page 104 This requires mouse clicking, and uses familiar dialogs. Note: double-clicking with the mouse on a mark locates you there without closing the dialog. This can be very useful. Xynergi Media Production Centre Page 106...
- Page 105 Search Sort the clips in track order, start order, end order or duration or clip colour, by clicking on the column header. Clicking the header a second time reverses the sort order. Xynergi Media Production Centre Page 107...
-
Page 106: Jump By Seconds
Step 2 Press a button from Step 3 Press more buttons if you want to make more jumps numpad Step 4 Release the button Jump If you press 1, the transport jumps by one second Xynergi Media Production Centre Page 108... -
Page 107: Review
Step 3 Press more buttons if you like numpad Step 4 Release Review The review time is set to the number you pressed, and the review command is issued each time you press a number. Xynergi Media Production Centre Page 109... -
Page 108: Play Jog
When Shuttle is active, the transport moves forward or backward, using the Jog Wheel as a speed dial. Audio is heard with shuttle speeds up to about four times play speed (depends on number of tracks playing, and speed of disk system). Xynergi Media Production Centre Page 110... - Page 109 Loop width – can be set in milliseconds (minimum 20 ms) Jog Gear – changes gear ratio for linear jogging Jog Dim – allows the level to be dropped automatically in loop jog Xynergi Media Production Centre Page 111...
-
Page 110: Editing
Introduction This chapter goes into more detail about Xynergi editing. Edit Modes Xynergi editing uses six main modes, selected in the Edit Megamode: Copy copies the selection to the clipboard (Enter pastes it into the tracks) cuts the selection to the clipboard (Enter pastes it into the tracks) Erase erases the selection. -
Page 111: Cut And Paste
Step 4 Select another track (and/or move to another location) The ghost shows where the clipboard contents can be pasted. Step 5 Press the key to paste the clipboard. Enter Xynergi Media Production Centre Page 113... - Page 112 Step 4 Select another track (and/or move to another location) The ghost shows a head- shaped clipboard ready to be pasted. The original tail is now Blue, because its track is not selected. Xynergi Media Production Centre Page 114...
- Page 113 (if not already selected) Step 3 Press the cut range The audio in the range is moved to the clipboard. We see the ghost. Step 4 Select another track (and/or move to another location) Xynergi Media Production Centre Page 115...
- Page 114 Enter whatever tracks are selected. You can paste the clipboard contents at any time, not just after a cut operation, and as often as you like. Xynergi Media Production Centre Page 116...
- Page 115 Press down the key (don’t release it yet!) cut clip With your other hand, jog the transport forward Release the key – the clip you cut is now pasted where you jogged. cut clip Example 2 Xynergi Media Production Centre Page 117...
-
Page 116: Copy
Reverses the audio in every second copy of the clipboard used for filling. This can give a smoother effect. overlap Controls the length of overlap between pieces of audio used in the fill command. To use the function: fill Xynergi Media Production Centre Page 118... -
Page 117: Paste Special
The clip whose characteristics are copied is the earliest (in timecode) on the lowest numbered track copied to the clipboard. The special paste targets every clip that is wholly within the range, on selected tracks. Xynergi Media Production Centre Page 119... -
Page 118: Trim
Trim clip changes both ends of the clip at once. Its purpose is to preserve the length of the clip, but access an earlier part of the recorded audio. Not commonly used. Range Ranges cannot be used with Trim. Xynergi Media Production Centre Page 120... -
Page 119: Slip
(and hold it down) slip clip Step 4 Jog or play the transport Step 5 Release the key – the clip is moved by the amount you just moved the transport. slip clip Xynergi Media Production Centre Page 121... -
Page 120: Nudge
Range. can operate in fixed steps of plus or minus one frame, or in steps from 1 to 99 nudge Variable sub-frames (a sub-frame is 1/80th of a frame). Xynergi Media Production Centre Page 122... -
Page 121: Fade And Crossfade
Using Picture Keys Fade Head One of the simplest fades can be achieved as follows: Step 1 Select a track and move a clip under the cursor. Step 2 Press the button (if not already on). Xynergi Media Production Centre Page 123... - Page 122 Step 3 Set the Duration value using the Jogger Wheel (press Stop if it is jogging the transport), by typing numbers in the Numeric keypad, or using the QWERTY keyboard. Xynergi Media Production Centre Page 124...
- Page 123 Use the Jog Wheel to adjust the X-Level X-Point You can see the change in the shape, as well as the value you are jogging, by looking at the Fade Panel in the upper part of the Editing Screen. Xynergi Media Production Centre Page 125...
- Page 124 Each of the custom presets (if any exist) will be shown in turn, and its shape displayed in the Fade panel. Stop scrolling when you have loaded the preset you want. To save the current shape to a new custom preset: Xynergi Media Production Centre Page 126...
- Page 125 (X-Level) – controls how loud the fade is (compared to the full Level of the clip) at the Attenuation Crossover point. – the total length of the fade, in frames. (Duration is not really part of the shape, but its Duration control is close by). Xynergi Media Production Centre Page 127...
- Page 126 Turn the Jogger Wheel, and as each custom preset is displayed it is also loaded. Stop when you have loaded the one you want. Alternatively use the custom presets pulldown menu in the Fades display. Xynergi Media Production Centre Page 128...
- Page 127 If the clip underneath already has its own fade, overlapping the time of the upper clip’s crossfade, then no induced fade occurs. In the following illustration, clip layering has been turned on (double press the button or View Display Layering). takes Xynergi Media Production Centre Page 129...
- Page 128 The same technique can be used to fade one clip EQ setting to another, within the same piece of audio. In the above illustration, the top layer plays the same audio as the bottom layer, but may have different level or EQ settings. During the fade-in and fade-out, the settings will effectively crossfade. Xynergi Media Production Centre Page 130...
-
Page 129: Editing On Multiple Layers
Clip Layering on and off. Note: you can use all the commands whether or not Clip {On/Off} Layering is displayed. The Track Menu Xynergi offers a group of commands that work between tracks, called the Track Menu. Xynergi Media Production Centre Page 131... - Page 130 Step 2 Create a range in which you want to copy the audio to the destination track, using the From buttons. Step 3 Press the soft key copy Step 4 Choose the destination track Xynergi Media Production Centre Page 132...
-
Page 131: Xynergi's Quick Edit Layout
The audio in the range is copied from the source track to the destination track, replacing the audio that was there. Xynergi’s Quick Edit Layout The Quick Edit Layout provides a faster way to perform basic edit functions. It combines a number of the most-used commands into one layout, to reduce the number of keystrokes needed. - Page 132 Start with the cursor touching a clip where you want the Fade In point. Step 2 Press and hold the button. Fade Head+Curve This will cause the Fade display to show in the Smart Pane. Step 3 Turn the to adjust the displayed curve. Jog Wheel Xynergi Media Production Centre Page 134...
-
Page 133: Importing Clips From Other Projects
Note: Clips on multiple tracks can be level-adjusted at the same time. If a range is present, all clips wholly inside the range will be affected. Importing Clips from Other Projects The Import Menu allows you to copy clips from other projects, into the current one. Xynergi Media Production Centre Page 135... -
Page 134: Clip Level
A quick way to change clip level or display amplitude is to use the Jog Level and Jog Display buttons. These appear next to the Jog Wheel whenever the Clip Level menu is active. To quickly change clip level: Xynergi Media Production Centre Page 136... -
Page 135: Gating Clips
Once you have adjusted the threshold so that the undesired portions of the clip are highlighted in pink, adjust the hold time and pre handle time to fine tune the gating process(see below). Threshold defines when the gate “opens” to preserve audio in clip Xynergi Media Production Centre Page 137... -
Page 136: Replacing Audio Media
Range to select multiple clips horizontally – in this case only clips lying entirely inside the range will be affected. Step 2 Issue the command Process Change Media – Selected Clips The system displays a dialog where you can browse for a media file. Xynergi Media Production Centre Page 138... -
Page 137: Undo And Redo
Click the Setup menu item at the top of the Edit Screen Step 2 Select General Preferences Step 3 Click the Project tab Step 4 At the bottom of the dialog, check the Playhead Follows Undo and/or Zoom follows Undo controls Xynergi Media Production Centre Page 139... -
Page 138: Mouse-Based Editing
When clips are placed “on top” of each other, only the uppermost is heard, or at most a crossfade between the top and second layers. The software allows you to see all the layers by selecting Display Layering from the View menu or by double-pressing the button in the Editor Megamode. takes Xynergi Media Production Centre Page 140... - Page 139 Note that there is always a space at the top of each track, equal to the width of one clip. This is to allow room for you to drag a clip into the top position. Xynergi Media Production Centre Page 141...
- Page 140 User Manual February 16, 2010 DITING Mouse Edit Menu The screen Edit Menu provides many commands that are available elsewhere in the system. The mouse can be used to access these commands. Xynergi Media Production Centre Page 142...
- Page 141 Turns Razor edit on and off Toggles range selection type between inclusive and exclusive Turns Snap Editing On or Off Defines where clips snap to when mouse editing Defines Jump destination points for speedy project navigation Xynergi Media Production Centre Page 143...
-
Page 142: Fade Menu
Uses Playback head location on a clip to guess desired fade Fades to head of Clip(s) Fades to tail of Clip(s) Makes a one second overlap by pulling out the head and tail of butted clips Xynergi Media Production Centre Page 144... -
Page 143: Automation
– Mute There are literally thousands of mix items in the Xynergi system. The automation system can write the changing values or states of every mix item over the duration of your project, and read it starting at any position. These written values and states are called mix automation data. -
Page 144: How To Use Automation
– automation stops writing and Auto buttons are extinguished Stop The mix items that will be recorded are those for the enabled parameters/signal paths. Notes: You can press Auto before or after pressing Play. Xynergi Media Production Centre Page 146... - Page 145 This is the same as Touch – Snap, except once a control is touched, it stays in record even after you release it. or other standard methods to exit all recording, or press to take the current signal path Stop Auto out of record. Xynergi Media Production Centre Page 147...
-
Page 146: Enabling Mix Items
Mix menu. Step 2 Select paths on the Xynergi path keys, either using the 12-track display or pressing the button to access more channels. This includes Track Feeds, Live Feeds, Main Bus, Sub-Buses, Aux Buses, Multi Track Buses (press Multi Track and use Live Feed keys). -
Page 147: Mix Item Status
Preview is a combination of isolation and enablement. The mix items that are in preview are not controlled by the automation system, so they respond manually to their controls. But when the console enters automation record, they all go into Write (or Trim). Xynergi Media Production Centre Page 149... - Page 148 Use Touch mode and move any fader, pot or switch on your Sidecar or the Xynergi Pad. The mix item it controls is put into Write or Trim if it is enabled. If Touch Auto Enable is OFF, the signal path and parameter must both be enabled for mix items to enter record.
- Page 149 There are two main forms of automation data recorded in a project. The first is the static snapshot of all parameters which is recorded whenever a mix is saved. The second type of data are the dynamic auto- Xynergi Media Production Centre Page 151...
-
Page 150: Programmed Automation
Out point active. The Active Out Auto Punch appears, if not already displayed. Note: you do not need to activate both In and Out points. See below for consequences. Xynergi Media Production Centre Page 152... -
Page 151: Saving And Loading Mixes
Mix menu. When the space left falls below 2% the soft key Save becomes disabled. Saving a Mix Step 1 Press the button. File Step 2 Press the soft key in the LCD menu. Save Xynergi Media Production Centre Page 153... -
Page 152: Mix Undo
File Save new project. Mix Undo The automation system supports one level of mix undo. Step 1 Press the button. Mix Menu Xynergi Media Production Centre Page 154... -
Page 153: System Mix' - Save Function
- When a Touch mode is engaged (SNAP or LATCH), only feeds or buses that have been enabled in the mix menu will be put into Write or Trim when their enabled parameters are Xynergi Media Production Centre Page 155... -
Page 154: The Utils Menu
Automation with Link Groups Link groups are useful for dealing with groups of feeds carrying audio in a multi-channel format such as stereo or 5.1. See “Grouping” on page 212 for an overview of link groups. Xynergi Media Production Centre Page 156... -
Page 155: Mix Editing
"in and out" point with no "dynamic" information in between. These neutral events can nonetheless add up to a lot of data. With Mix Thinning turned on, multiple identical events of Xynergi Media Production Centre Page 157... -
Page 156: On-Screen Mix Controls
Update Sys File Step 3 Type <Shift-Pause-Q-Y> on the keyboard to quit out of the FMC console software program. Step 4 Navigate in Windows to \Fairlight\FMC\Data and open the file System_Variables.TXT Step 5 There is a line in that file: MIX_THINNING_ENABLED, 0 Set the 0 to a 1 and save the file. -
Page 157: Automation Curves
Select a parameter to be displayed using either the pull down menu Step 3 Click the Save button Step 4 Click a preset button Step 5 The system will request a name for the preset. You may use the suggested name or choose your own. Xynergi Media Production Centre Page 159... - Page 158 Note that, in this case, the red line continues past the cursor. This shows accurately what will happen when Write is exited, because the system On Stop setting is EVENT, meaning the current value will be held until the next change in automation value. Xynergi Media Production Centre Page 160...
- Page 159 You may change the event value (move up or down) or its timecode (move left or right). The timecode position is bounded by the next and previous events. The timecode and current value of the event are shown in the Automation Edit group of the Smart Pane. Xynergi Media Production Centre Page 161...
- Page 160 Automation changes made by editing or redrawing can be undone by pressing the soft Undo Mix Pass key in the Mix Menu. There is only a single level of Undo, so only the last change you made can be reversed. Xynergi Media Production Centre Page 162...
-
Page 161: Time Domain Processing
ROCESSING Time Domain Processing Introduction Xynergi provides powerful Time Compression and Expansion via Serato’s Pitch ’n Time FE (Fairlight Edition), and automated dialog alignment via Synchro Arts Vocalign Project. Time Compression/Expansion Serato Pitch ’n Time FE provides the industry’s finest time compression and expansion. Change length without changing pitch, or pitch without changing length, and hear the result in real time as you jump from clip to clip. -
Page 162: Using Vocalign Processing
VocAlign will attempt to match the second track to the guide track. Note that VocAlign cannot process clips longer than 120 seconds Step 3 Press the soft key. The VocAlign popup will appear. {VocAlign} Xynergi Media Production Centre Page 164... -
Page 163: Removing Clicks
Note that the click must not be in the fade-in or fade-out area of a clip, and that the command does not work on linked clips (i.e. Multi-Channel clips). Undo is available after using the Remove Click command. Xynergi Media Production Centre Page 165... -
Page 164: Tracks & Transport
Tracks & Transport Introduction Xynergi provides up to 192 disk recorder tracks routed via dedicated track feeds. In addition to the track feeds it supports live feeds which may be used for effects returns or any other real-time signal source. -
Page 165: Pyxis Track - Displaying Video
Each track has a colour that is shown at the left, and which can be given to the clips on that track. Selected clips are always shown red, i.e. those touching the cursor or in a range, on selected tracks. Xynergi Media Production Centre Page 167... - Page 166 When you choose a track colour, all clips on the track that currently have its old colour are given its new colour. This applies to all clips for which you have never explicitly chosen a colour. Xynergi Media Production Centre Page 168...
-
Page 167: The Clip
RANSPORT The Clip When audio is recorded or imported into Xynergi it is displayed as a clip. The clip is a reference to the audio data stored on disk. Clips can be cut, copied or moved without affecting the original audio data. - Page 168 Click OK to create the clip. It will be placed at the current timecode position, on the track that you chose. Clip Display Information You can choose which information is displayed in clips using the command: View Displayed . The system displays a dialog like this: Clip Information Xynergi Media Production Centre Page 170...
- Page 169 Multichannel Clips Multichannel clips are linked for editing operations. They are displayed with no separating line, and a little smaller in height. The picture below shows two stereo multichannel clips. Xynergi Media Production Centre Page 171...
-
Page 170: Selecting Tracks
Press a dark onscreen track selection key to add that track to the selection. Press a lit onscreen track selection to remove that track from the selection. Click and drag your mouse in the onscreen track selection pane to select/deselect multiple tracks. Xynergi Media Production Centre Page 172... -
Page 171: Time Scale And Display Zooming
The track display represents a 24 hour continuous loop. The timescale can be zoomed from a few samples across the screen to eight hours. The Zoom number and screen width are shown at the bottom left of the screen. Xynergi Media Production Centre Page 173... - Page 172 To toggle between whole frames and frames with subframes, hold down the BLUE key and press key in the Numeric Keypad. Subf/Clear For all other timescale choices, select View Timescale and choose one of the options. Xynergi Media Production Centre Page 174...
- Page 173 Expressed as beats per minute. The box on the right allows you to choose the beat value used in specifying the tempo. In some cases you may wish to specify beats differently from the time signature. Time This is the time signature, expressed in the usual way. Xynergi Media Production Centre Page 175...
-
Page 174: Audio Scrollers
Audio Scrollers give you an optional close-up waveform view of one or two tracks that can be useful for editing or mixing. They effectively provide an extra zoom range to use on tracks of particular interest, while the rest of the screen gives more contextual information. Xynergi Media Production Centre Page 176... - Page 175 This is useful for moving the timeline. Scrollers follows current track – the scroller automatically chooses the most-recently- selected track for display. Note: the Video Scroller is described in the chapter called Pyxis Track. Xynergi Media Production Centre Page 177...
-
Page 176: Transport Controls
Audio is not heard while this takes place. Shuttle To shuttle the transport, hold down the BLUE key and press . The jogger wheel will JOG/SHUT then increase and decrease the transport velocity in forward and reverse. Xynergi Media Production Centre Page 178... - Page 177 To shuttle at double play speed, hold down and press SHIFT ctrl The transport key LEDs reflect the current speed and direction. For example, if shuttling reaches play speed, the play light comes on. Xynergi Media Production Centre Page 179...
-
Page 178: Clip Equalisation
This chapter goes into more detail about Clip EQ. Xynergi provides clip based, four band parametric Equalisation (plus shelving) which can be applied to a single clip or range of clips within a Project. EQ is performed by the system on a coy of the original media, therefore applying an EQ change does not affect the audio data on disk. - Page 179 This displays the Q of the band or indicates the type of shelf. Range 0-99. Used with the Apply command. Only the Enabled bands are Enables applied to the selected clips. Value Grid The Value Grid shows all the current parameters of the EQ being changed. Xynergi Media Production Centre Page 181...
- Page 180 Locate the cursor over the source clip. Step 3 Press the soft key or click the button on the screen. copy Copy Step 4: The enable checkboxes allow you to choose which of the bands are pasted into your Xynergi Media Production Centre Page 182...
- Page 181 A saved EQ setting can be deleted by first selecting it from the drop list, then clicking the Delete button. A special preset can be created called “default”. Whenever the Clip EQ display is opened for a clip with no EQ, this preset will automatically be loaded into the display. Xynergi Media Production Centre Page 183...
-
Page 182: Screen Mix Controls
A Tile shows basic information about the Feed it represents. Bus tiles show only fader information. Track Feed and Live Feed tiles display more information, and provide control for a group of functions, as shown below. Xynergi Media Production Centre Page 184... - Page 183 EQ – a graph displays the EQ transfer response. Dynamics - a simplified transfer function for compressor, limiter, expander, gate, and the various combinations of these can be displayed. Xynergi Media Production Centre Page 185...
-
Page 184: Mouse Control In The Mixer Screen
For rotary knobs, first click and hold near the center, then drag the mouse in a ring around the knob. A tooltip shows you the current value. Click the up/down buttons for fine change. Xynergi Media Production Centre Page 186... -
Page 185: Fat Channel
The Fat Channel provides a detailed display of the signal processing and routing for the called channel. Its only control function is the fader, while the other graphics are for display only. Right clicking in the EQ, DYN or PAN sections causes display of the Zoom panels. See below. Xynergi Media Production Centre Page 187... - Page 186 When diverge is applied, a white circle represents the perceived image size. When a bus is called, the output box displays the output patching, showing each bus element and the user and system names of the physical outputs to which they are connected. Xynergi Media Production Centre Page 188...
-
Page 187: Virtual Channel
To close the Virtual Channel, right click anywhere inside it. While it is open, you may move to the next or previous channel by clicking the + and – buttons next to the channel name. Click to select next or previous channel Xynergi Media Production Centre Page 189... -
Page 188: Input Section
ONTROLS Input Section 48 V and Mic Control Used for Fairlight Mic preamps Recording Section Available only when a track is the current channel. Arm means ready to record – press this button only if there is an audio source patched to the current track. -
Page 189: Panning
Spreads the signal of an individual feed across more of the adjacent loudspeakers, making the perceived size of the sound source larger. Rotate Rotate controls the left/right and front/back pan control to rotate the surround mix around the centre of the room. Using the panner: Xynergi Media Production Centre Page 191... -
Page 190: Equalisation
The Hi and Lo Pass filter sections can be switched to shelves using the mouse wheel. The parametric bands can be switched between Bell, Lo-Shelf, Hi-Shelf and notch using the mouse wheel. Their frequency ranges can also be switched between Low, Low-mid, High-mid and High. Xynergi Media Production Centre Page 192... -
Page 191: Dynamics
Each section has an independent IN / OUT control. All three may be active at the same time if required. The Fat Channel shows the transfer function of the dynamics control, plus gain reduction metering. Xynergi Media Production Centre Page 193... - Page 192 User Manual February 16, 2010 CREEN ONTROLS Xynergi Media Production Centre Page 194...
-
Page 193: Aux Sends
It is possible to see more detail when adjusting EQ, Dynamics and Pan control, using Zoom Panels. In particular, numeric values for all parameters are shown, and update as they are changed. To display a zoom panel, right click in the corresponding display in the Fat Channel. Xynergi Media Production Centre Page 195... - Page 194 User Manual February 16, 2010 CREEN ONTROLS Right-Click here to display Zoom panels The Equalizer Panel The Dynamics Panel Xynergi Media Production Centre Page 196...
- Page 195 February 16, 2010 CREEN ONTROLS The Pan Panel In addition to using the hardware controls, you may “turn” the knobs on the screen, or use the mouse to move the red dot around the pan field. Xynergi Media Production Centre Page 197...
- Page 196 To choose the 3D panner as your panning display: Step 1 Click on the Mixer Screen and type Shift+ctrl+U, which opens the System Variables dialog. Step 2 Select the Show 3D Panner checkbox. Step 3 Click OK to close the dialog. Xynergi Media Production Centre Page 198...
- Page 197 You may superimpose the 3D Panner on your Pyxis Track video. This allows you to see very clearly how the panning corresponds to action on the screen. To toggle display of the Pan Theatre, click the Video button in the 3D panner. Xynergi Media Production Centre Page 199...
- Page 198 User Manual February 16, 2010 CREEN ONTROLS The Aux Panel Xynergi Media Production Centre Page 200...
-
Page 199: On-Screen Automation Controls
Faders in READ The controls in the lower right of the screen correspond with controls in the menus and on the Xynergi picture keys. The Mix On checkbox is equivalent to the Mix On button. Xynergi Media Production Centre Page 201... -
Page 200: Meters
Note: If more than eight elements are selected, the first eight, reading from left, are shown. Master Screen Meters Xynergi provides a set of eight Master Screen Meters. To toggle them on and off: Use the soft key in the menu. - Page 201 With selected, select one Meter Set or a number of Main and Sub buses. Meter Set Meter Sets cannot be added to other sets or buses. Xynergi Media Production Centre Page 203...
- Page 202 To display history click in the Peak or RMS level display for a meter. Click here to delete history and start again. Also clears peaks and displayed maximum values. Click any one of these fields to display (or hide) Peak or RMS history. Xynergi Media Production Centre Page 204...
-
Page 203: Meter Sets
(you can change your choice later) Meter Sets Step 2 Click the button. The system displays the Patch I/O page. Define Step 3 Select the source type you want in the lower left section. Xynergi Media Production Centre Page 205... -
Page 204: Peaks
The numeric peak levels displayed on the mixer display bus meters have a variable threshold. The level at which these values are displayed can be set in the C:\Program Files\ Fairlight\FMC\Data\System_Variables.txt file. Edit the following line in the file: PEAK_DISPLAY_LIMIT,950 The value is from 0 to 1000 in 0.1dB steps where 1000 = full scale level. -
Page 205: Meter Point
Press the button. Meters Step 2 Press the soft key repeatedly to move the meter point. Mtr Pnt The meter point can be seen in the Fat Channel by the position of the meter graphic. Xynergi Media Production Centre Page 207... -
Page 206: Macros
” this is a soon-to-be-labeled button next to Xplain Key 7 Key 7 Either of these keys will toggle the macro trigger buttons on and off the Xynergi Tactile Controller. Macro trigger buttons can be displayed in two possible places: ... -
Page 207: Recording Macros
Sometimes macros run so fast that we create a “race condition”. This happens when different parts of the Xynergi system get their timing wrong, and events happen in the wrong order. If you play back a macro from the correct starting point, and it does not repeat the desired commands, try recording it again, but this time insert a delay. -
Page 208: Macro Names
Picture Keys. Step 2 Select the macro whose colour group you want to change by pressing its trigger button. macro Step 3 Press the soft key a number of times. group Xynergi Media Production Centre Page 210... -
Page 209: Editing Macros
But keys like this… CONTROL,0,CID_SW_MFX4_61,0 CONTROL,656,CID_SW_CUSTOM_16,1 … are internal macros built by Fairlight programmers. No list is available. Good luck with this. Note: after editing and saving your macro.txt file, you must restart the Xynergi system before the macros are reloaded. -
Page 210: Grouping
Normally each member is panned hard to one Bus Element position, spread is set to maximum, divergence is set to minimum and rotation is set to zero. This fixed pan configuration is optionally chosen when the Link Group is created, and cannot be changed afterwards. Xynergi Media Production Centre Page 212... - Page 211 The feeds that currently belong to link groups are shown in yellow or brown. Feeds available for selection are shown in dark blue. Step 3 Press the feed selection key of the first feed of the group. Its key lights up, and all other buttons Xynergi Media Production Centre Page 213...
- Page 212 The link group is displayed in the Mixer Screen like this: Unselected Link Group Selected Link Groups Link Group is Current Path It is also shown in the channel display at the bottom of the mixer display. Xynergi Media Production Centre Page 214...
- Page 213 You can collapse linked tracks down to the width of one track by double-clicking any of the linked tracks, close to its left side. Do the same thing to expand them. In Xynergi, Track Link Groups are displayed with lines through the buttons, as follows: Unselected...
- Page 214 70%, so Spread box is set members are to maximum size, brought inwards. so Link Group Now the whole members cannot Spread box can be be panned any moved LR and FB. wider, nor moved. Xynergi Media Production Centre Page 216...
-
Page 215: Fader Groups
To call the Group Master, click on its tile on the Mixer Screen. If the Group Tiles are not shown on the Mixer Screen, open the System Variables screen by typing . and select one of the Screen Layout options that include VCA Masters. ctrl+u Xynergi Media Production Centre Page 217... - Page 216 Use the mouse directly on the Mixer Screen, by moving the Group Master faders. By clicking on a Group Master you call it, and that displays a larger fader in the Fat Channel. Click here to display Group 2 Master Fader here Xynergi Media Production Centre Page 218...
- Page 217 , or right-click on the window. SHIFT+ctrl+V Assignment from the Virtual Channel Membership of fader groups can also be controlled in the Virtual channel, which is accessed by right- clicking a channel tile in the Mixer screen. Xynergi Media Production Centre Page 219...
-
Page 218: Naming A Group
Zero means no Fader group membership. Naming a Group Groups are named the same way as other signal paths, using the Name Path function (see page 41). Multi Trim MultiTrim group members Xynergi Media Production Centre Page 220... - Page 219 Link Group adopts the fader value of the first member, removing any offsets between them that might have existed earlier. To clear the MultiTrim Group, double click on one of the red channel numbers. Xynergi Media Production Centre Page 221...
-
Page 220: Using Xe-6 Faders
The Xe6 Fader Extender has 6 faders for individual feeds, buses, or groups. You can use up to four of these units together on one Xynergi system, to control up to 24 signal paths at the same time. Installation of Xe6 faders is described in detail in the Xynergi Installation manual: Xynergi Media Production Centre Quickstart.pdf, which is supplied with your system, and found in the folder... -
Page 221: The Oled Display
Grouping shown if active More variations: Rotary can be assigned to other parameters Read Status for Mute Metering for Link Groups Fader level is shown and busses while it is being touched can be multi- channel Xynergi Media Production Centre Page 223... -
Page 222: Fader Sets
For each fader, the Call button puts that channel into the Pad. It does not select the channel for editing or mass-channel mixing operations. Its action is NOT equivalent to pressing the channel’s selection button on the Xynergi surface, because: ... -
Page 223: Fader Function
Step 2 Press the button. Faders To… Step 3 Select from the available functions that appear on the Xynergi buttons Step 4 Press the button. exit The OLED display names the function you are controlling with the fader. Note that the... -
Page 224: Using The Fairlight Fader Sidecar
AIRLIGHT ADER IDECAR Using the Fairlight Fader Sidecar Introduction The Xynergi Fader Sidecar has 12 faders for individual feeds, buses, or groups. Fader Controls Name of signal path Name of signal path Soft Pot – normally Left-Right Pan Control, but switchable to other... - Page 225 This is done simply by pressing and releasing the button. Note: If you have not chosen any non-standard setting since the system was started, the button toggles between Pan LR and Pan FB, which is useful for 5.1 surround work. Xynergi Media Production Centre Page 227...
-
Page 226: Using Groups
All other controls on the Channel Panel continue to function normally. To select the function follow these steps: Faders To... Step 1 Hold down the BLUE key and press the key to display the Faders To... menu. Faders To... Xynergi Media Production Centre Page 228... - Page 227 This can be used to control the level going to disk during recording. Note that live feed faders are inactive when Faders To Input is selected. This fader control cannot be automated. Xynergi Media Production Centre Page 229...
-
Page 228: Fader Sets
Step 5 Press the key to complete mapping or select another fader set to map. Mapping Multiple Faders A range of feeds may be mapped to a range of faders. Xynergi Media Production Centre Page 230... - Page 229 The existing channels will temporarily replace those in the new fader set. Press the fader set key without holding a fader, to resume the normal fader set. Xynergi Media Production Centre Page 231...
-
Page 230: Audiobase
Step 1 After searching the database, a list of matching clips is displayed. Ensure the transport is in , then use the or the buttons to highlight the clip you want. Jog Wheel – STOP Xynergi Media Production Centre Page 232... - Page 231 To hide the AudioBase3 results list, simply enter another mode (e.g. Cut). Set up your AudioBase3 Server in Setup/General Preferences. Example: http://192.168.1.100/AudioBase/MFX/search_d2.php (Where 192.168.2.100 is the IP Address of your MediaLink2 Server. Xynergi Media Production Centre Page 233...
-
Page 232: Adr
In and Out times for your cue. (If there is no range, the cue will be created with the transport position as its In time, and 5 seconds duration.) Step 1 Click Add or press the soft key {add cue} A dialog appears for writing the text of your cue. Xynergi Media Production Centre Page 234... - Page 233 Step 2 Type the name of a new character Step 3 Click the Add button Filter by character To show only one character’s lines, use the Character drop down menu to select one character. Xynergi Media Production Centre Page 235...
-
Page 234: Adr Preferences
ADR Preferences Once you have entered all the cues that you want to use, you may set up your preferences by clicking the ADR Menu and selecting ADR Preferences. The following screen is displayed. Xynergi Media Production Centre Page 236... -
Page 235: The Adr Display
To turn it on, use the toggle ADR Display Cycle The Cycle command is used to initiate ADR actions. It will execute rehearsal, recording and playback, depending on the mode of the ADR system. See below for details. Xynergi Media Production Centre Page 237... - Page 236 The streamer will still indicate the cue in time, but you are able to capture the audio a little earlier. Early In Early In can be clicked during the preroll of a record cycle. It causes recording to start immediately. Xynergi Media Production Centre Page 238...
- Page 237 The format described above is the native format used by Pyxis NLV for storing ADR cue lists. You can edit the stored ADR cue lists directly in any word processor or text editor, as long as you make sure you save the file as a text file. Xynergi Media Production Centre Page 239...
-
Page 238: Auto Conform With Edl Tool
This will cause the display of the EDL dialog Capture and Conform Capture and Conform are performed at the same time. The audio for each line in the EDL is captured and immediately conformed. Xynergi Media Production Centre Page 240... - Page 239 Events that are marked with an R will not be recorded, even if they are selected. Each time the system performs a recording, the events that successfully record are automatically marked this way. You may also click in the checkbox for any event to mark or unmark it manually. Xynergi Media Production Centre Page 241...
-
Page 240: Reconform
Capture process, as the audio is already present on hard disk, but otherwise the process is very similar to Conform. Each reel in the EDL may be mapped to a different audio project. Step 1 Set up Track Mapping (as for Capture) Commonly all tracks will be involved. Xynergi Media Production Centre Page 242... -
Page 241: Additional Facilities
Clicking the A button in the Sort group causes the EDL events to be sorted according to the EDL event numbers. Clicking the C button in the Sort group causes the EDL events to be sorted according to source reel. Xynergi Media Production Centre Page 243... -
Page 242: Project And File Management
ANAGEMENT Project and File Management Introduction File handling in Xynergi supports legacy formats from previous products, but also introduces powerful new Project and File management capabilities. This chapter details the way the system looks after files. Project Formats In Xynergi, two “native” project formats are supported. -
Page 243: Mt Projects
Recording Files (FUFs) When using the MT project format on a Xynergi system, new audio recordings are stored in ‘FUF’ files. ‘FUF’ stands for ‘Fairlight Universal Format’, and a FUF file acts as an ‘audio container’ with many individual audio files bundled inside it. - Page 244 When the first FUF file reaches 4 GB, another one is automatically created. Stuffing FUFs Xynergi allows external files to be dragged and dropped onto the timeline. Since these files are not recorded into the Xynergi MT Project, they are not automatically added to the FUF files associated with the MT Project.
-
Page 245: Dr2 Projects
When using the DR2 format, new audio recordings are stored as industry standard Broadcast WAV Files. Xynergi Broadcast WAV Files are stored in the ‘Media’ subfolder of the DR2 Project folder. The WAV files are created when recording starts, and they are refreshed at regular time intervals during recording. - Page 246 The GUID is a system number, discussed below. GUIDs Xynergi Broadcast WAV Files are named using ‘GUIDs’. A GUID is a unique ID that makes it easy for the system to locate files in a database. Since GUIDs are hard to read, Fairlight has created the Fairlight Shell Extension for Windows Explorer.
-
Page 247: Waveform Profiles
After some time the number of profiles can get quite large and use a lot of space on your computer. The system automatically deletes profiles if they have not been used for a certain number of days. To control how many days, use the command Setup General Preferences Projects Xynergi Media Production Centre Page 249... -
Page 248: Revealing The Project File
Automatic File Saving Automatic File Saving allows you to save your project automatically at regular time intervals. To set this up, issue the command , and go to the Projects tab. Setup General Preferences Xynergi Media Production Centre Page 250... -
Page 249: Undo Files
This is necessary to prevent unwanted interaction with the automation system. Undo Files Xynergi allows unlimited UNDOs for audio editing. It does this by storing a copy of the Edit list each time an edit is made. The undo files are stored in the folder C:\Program Files\Fairlight\Dream II\Undo Each time a project is opened, the system starts writing undo files for it, starting with a file called UndoFile_00.1. -
Page 250: Video Files
ANAGEMENT Video Files Xynergi supports drag and drop import of a variety of video file formats, as well as direct video recording to the Xynergi timeline. For correct operation, video files must be played from and recorded to a separate hard disk than the audio data. -
Page 251: Creating New Projects
Creating New Projects Once Media Devices have been set up on your Xynergi system for Audio and Video, you are ready to create a New Project. To do this, Press the Project key on your Xynergi controller followed by the New softkey –... -
Page 252: Media Scanning
Setup Media and Project Management the XYNERGI main menu. Controlling Scanned Folders You may wish to save time when the system starts by omitting the scan of some folders in your system. This is particularly useful when the system is connected to a network. In the Media and Project Management dialog you can display all storage devices, folders and files. - Page 253 UNDO files as well, so UNDO is not possible afterwards. This is great for recording sessions with a lot of useless takes, because only the ones used in the project survive. Xynergi Media Production Centre Page 255...
-
Page 254: Pyxis Track
Pyxis Track Introduction Pyxis Track is Xynergi’s built-in video disk recorder and editor. It can import files of many formats, and export to many formats. Some of these formats require special licences to operate. See below for import / export information. -
Page 255: Hiding And Showing The Video Track
You can adjust for this using the General Preferences dialog. To access this, click Setup at the top of the Edit Screen, then click General Preferences, then Playback. Xynergi Media Production Centre Page 257... -
Page 256: Loading Video Into Pyxis Track
You can have a separate setting for your Decklink output and your VGA output, since they are likely to feed different monitors. Loading Video into Pyxis Track There are two methods for loading video into Pyxis Track. In both cases, the video track must be visible on screen. Xynergi Media Production Centre Page 258... - Page 257 Final Cut Pro, XML project – note that nested sequences are not imported also any Dream/Pyxis native files which are … - uncompressed (.vmu) - dv25 (.dif) - mjpeg (.vmj) - lossless (Huffman compression) (.vmh) Xynergi Media Production Centre Page 259...
- Page 258 Dv50, dv100 require a DVCPro Licence (dongle) Playing a QuickTime or AVI file requires that the latest available codec for that file type has been installed. Fairlight recommends that automatic update be switched on to ensure that the version remains current.
-
Page 259: Capturing Video Into Pyxis Track
Configure Dream II Video Capture options With Dream II launched, and a Project with Pyxis track open, navigate to Setup General Preferences Video Capture This window configures the Dream II part of the video capture system. Xynergi Media Production Centre Page 261... - Page 260 “Record Format” is the video file and codec format for capturing the incoming video signal. The options available are: - DV25 (DV Codec, 3.5Mb/sec, SD NTSC or PAL ONLY) - MPJEG - Uncompressed Xynergi Media Production Centre Page 262...
-
Page 261: The Pyxis Window
With Video Capture Mode ON, you may ARM the Pyxis track, and record the incoming video signal, in the same way as you would record audio. The Pyxis Window To show a window displaying your video, use the command: View Pyxis Xynergi Media Production Centre Page 263... - Page 262 To locate to any video locator, simply click it. To re-order the locators, drag and drop them with the mouse. To delete a locator, drag it far to the right and drop it when the delete icon is displayed. Xynergi Media Production Centre Page 264...
- Page 263 Use this button to toggle the Video Scroller on and off screen. Hold these down… … and click here Another way is to click: Setup General Preferences Scrollers Another way is to click: Setup General Preferences Scrollers Xynergi Media Production Centre Page 265...
-
Page 264: Editing The Video Track
Note: there is no zoom control on the video scroller. Editing the Video Track Selection To select the video track Click on the symbol at the left of the video track (double clicking makes it the only selection) Xynergi Media Production Centre Page 266... - Page 265 Picture keys (it’s at the lower left Video Track where ctrl is normally placed). Editing with XYNERGI Buttons Editing with XYNERGI Buttons Editing commands can be used with the video track, the same way as they are with audio. The copy and cut commands can be used as with audio to put video clips on the clipboard, but unlike audio clips, they can only be pasted back to the video track.
-
Page 266: Watermarking
Controls for watermarking are found in Setup General Preferences on the Watermark tab. This tab is present if a Decklink video card is present and active. See your Fairlight distributor for information about video cards. -
Page 267: Using Pyxis Track As A Machine
Using Pyxis Track as a Machine Selecting Pyxis Track as one of your machines allows you to take it “offline” the same way as physical machines. For information about setting Pyxis as a machine, see Machine Control, page 304. Xynergi Media Production Centre Page 269... -
Page 268: Plug-Ins And Rewire
February 16, 2010 INS AND Plug-ins and ReWire Introduction Xynergi provides powerful support for 3 party hardware and software plug-ins via the industry standard VST, VSTi and ReWire protocols. General Capabilities Plug-ins can be instantiated (placed) in Track Feeds and Live Feeds. This is done as an Insert to the feed. -
Page 269: Using Vst Effects In Xynergi
Now all channels feeding the Aux will be routed through the VST Effect. Please note that Fairlight supports VST effects from Mono to 5.1 - and beyond. These can be inserted on mono channels or on Link Groups. If a stereo VST Effect is inserted on a LCR, LCRS or 5.1 Link Group , the left and right channels will be allocated to left and right Link Group... - Page 270 Sometimes it may take up to a minute to load a plug-in, particularly the first one from any particular group from a manufacturer. The plug-in popup will now appear on the Editor screen, where the mouse can be used to Xynergi Media Production Centre Page 272...
-
Page 271: Automation Of Plug-Ins
GUI, do one of the following: Press the Plug-ins button in the Editor or Mixer Megamode. This will display the current plug-in for the channel. Right-click a Plug-in in the Mixer Screen Fat Channel Xynergi Media Production Centre Page 273... - Page 272 Library page shows an array of named presets at the same time. For instructions on using the Library see page 78. Xynergi Media Production Centre Page 274...
-
Page 273: Controlling Plug-Ins On The Surface
Controlling Plug-ins on the Surface Plug-ins can be controlled by a fader Side Car, or in the Xynergi Pad. Only ONE of these options can be exercised in your system. To determine which of these to use, edit the following file: C:\Program Files\Fairlight\FMC\Data\ FlexiSurface.TXT... - Page 274 Mute buttons. Click OK to implement changes and save them and close the dialog. Click Cancel to close the dialog without saving the changes. You may leave the dialog open and work with many plug-ins in one session. Xynergi Media Production Centre Page 276...
-
Page 275: Plug-Ins In The Pad
User Manual February 16, 2010 INS AND The settings are saved in C:\Program Files\Fairlight\FMC\Data\FlexiMaps, in a file called pluginname .FSM. You may edit these files, but that is beyond the scope of this document. If you edit a file wrongly, the Layout Editor may refuse to load the parameters from the plug-in. Your only recourse is to delete the FSM file and try loading the plug-in again. - Page 276 At this point the Pad controls should display parameters from the plug-in. These may be pre-arranged at the Fairlight factory (or by you or a colleague), or if not, they are shown by default in the order presented by the manufacturer – normal first, then ALT. Several pages may be filled if there are more than 16 plug-in parameters.
- Page 277 Switch 10 When you choose , the system displays dialog where the toggle display names can be set. Toggle By default these are shown as xx. You may replace them by Typing new names Xynergi Media Production Centre Page 279...
- Page 278 Clicking the Off/On button to set the values to off and on What happens when you press the Learn button: Xynergi sends an off value to the plug-in, then an on value. It waits to see if the plug-in sends return messages. If this happens, the messages may contain useful toggle names, but it is not mandatory in the VST specification for this to be provided, and many manufacturers just send a value like 0 or 1, or nothing at all.
- Page 279 Finding a Fleximap All Fleximap files are stored in C:\Program Files\Fairlight\FMC\Data\FlexiMaps Those addressing the Xynergi pad are in a subfolder called Xynergi, while those addressing a Sidecar are in the root of Fleximaps. A Fleximap file is a text file with an extension .fsm (or .FSM).
-
Page 280: Clip Based Plug-Ins
Step 5 Park the timeline on the clip that you would like to process and press the Preview softkey. The clip will automatically start looping and you can now adjust all parameters in real time. Xynergi Media Production Centre Page 282... - Page 281 This will directly render render your plug-in processing to the clip. Note: the original clip is still there, on an underneath layer so that you can quickly go back to the original recording if required. Xynergi Media Production Centre Page 283...
-
Page 282: Using Vst Instruments In Xynergi
DREAM II systems provide full “native” processing on every channel including EQ, Filters, Dynamics, and surround panning. This means plug-ins can be reserved for “special” applications. Using VST Instruments in Xynergi While Dream II does not include a MIDI sequencer, VST Instruments can still be played “live”... - Page 283 User Manual February 16, 2010 INS AND Using ReWire Devices in Xynergi Setup and installation Step 1 Install your software as outlined by your the manufacturer. Xynergi Media Production Centre Page 285...
- Page 284 ‘Page Down’ on the patch I/O page until you find the input for your Rewire application. Step 3 Select the desired instrument input (e.g. If using Reason, select the inputs labeled Mix L Xynergi Media Production Centre Page 286...
-
Page 285: Fairlight Partner Program
Fairlight Partner Program About the Partner Program The Fairlight DREAM II (Manufacturer) Partner Program streamlines the integration of third-party software applications into the open architecture of its CC-1-powered family of products offering greater system versatility, functionality and control. Select manufacturers from around the world can apply for the DREAM II Partner Program. - Page 286 Serato Pitch ‘n Time FE ( Fairlight Edition ) provides excellent time compression and expansion. Change length without changing pitch, or pitch without changing length, and hear the result in real time as you jump from clip to clip. Pitch ‘n Time FE is fully integrated into Fairlight Systems, allowing for fast, intuitive operation.
-
Page 287: Hui Slave Mode
HUI device (default 8). Just doing this will result in faders, mutes, pans, solos and selects from your HUI device working correctly on the Xynergi system. That is to say, they will act and will also tally the changes. MIDI Devices For HUI to work, the Xynergi system must know which MIDI devices to expect. - Page 288 FMC Start MSAT using: Start All Programs Fairlight FMC FMC Utils MSAT Shortly after starting it, if FMC is running, you’ll see an error message about incompatible file versions, which can be ignored.
-
Page 289: Remap File
The remap file takes keys coming in from the HUI device, and routes them to keys on your Dream II system. Here is the text in one remap file: CID_SW_MACKIE_STOP,CID_SW_STOP CID_SW_MACKIE_REWIND,CID_SW_REW CID_SW_MACKIE_FAST_FWD,CID_SW_FF CID_SW_MACKIE_PLAY,CID_SW_PLAY CID_SW_MACKIE_RECORD,CID_SW_REC CID_SW_MACKIE_ALT,CID_SW_BLUE_1 (Blue key) Xynergi Media Production Centre Page 291... - Page 290 There are some HUI keys not mentioned in this remap file. They are listed below. CID_SW_MACKIE_BANK_DOWN CID_SW_MACKIE_BANK_UP CID_SW_MACKIE_CHANNEL_DOWN CID_SW_MACKIE_CHANNEL_UP CID_SW_MACKIE_UP CID_SW_MACKIE_DOWN CID_SW_MACKIE_SHIFT CID_SW_MACKIE_CONTROL CID_SW_MACKIE_F1 CID_SW_MACKIE_F2 CID_SW_MACKIE_F3 CID_SW_MACKIE_F4 CID_SW_MACKIE_F5 CID_SW_MACKIE_F6 CID_SW_MACKIE_F7 CID_SW_MACKIE_F8 CID_SW_MACKIE_MIDI_TRACKS CID_SW_MACKIE_INPUTS CID_SW_MACKIE_AUDIO_TRACKS CID_SW_MACKIE_AUDIO_INSTRUMENT CID_SW_MACKIE_AUX CID_SW_MACKIE_BUSSES CID_SW_MACKIE_OUTPUTS CID_SW_MACKIE_USER CID_SW_MACKIE_OPTION CID_SW_MACKIE_SAVE CID_SW_MACKIE_UNDO CID_SW_MACKIE_CANCEL CID_SW_MACKIE_SOLO CID_SW_MACKIE_DROP CID_SW_MACKIE_CYCLE CID_SW_MACKIE_DISPLAY_SMPTE Xynergi Media Production Centre Page 292...
- Page 291 LAVE You may add any of these to your remap file, and assign them to any Dream II key. For help with Dream II key assignment, please consult your Fairlight customer support organization. Remap to Macros One easy way to get more power from HUI keys is to map them to your macros. An example of a...
-
Page 292: Advanced - Using Scripted Macros
Many HUI controllers have extra keys that can be assigned to various functions. This is done using a macro language developed by Fairlight. If you need special functions to be triggered from your HUI controller, please contact your Fairlight service provider. -
Page 293: Import / Export
Pyxis Projects – these are projects created using the program “Pyxis” OMF Files – these are files from other manufacturers ML Files – these are files from older Fairlight products. AES-31 Files – these are files from other manufacturers AAF Files – these are files from other manufacturers MXF Files –... -
Page 294: Importing Individual Sound Files
Clips subject to sample rate conversion are marked with a black label. The quality of sample rate conversion may be varied using the dialog Setup General Preferences General Xynergi Media Production Centre Page 296... -
Page 295: Export
Select the clip or clips to be exported. Ranges of clips can also be selected. Step 2 Click the File menu command above the Track display. Step 3 Choose Export, then Audio Tracks/Clips Step 4 The following dialog box appears. Xynergi Media Production Centre Page 297... - Page 296 (if Multiple Mono files have been selected). Then select the location you want the exported audio to go and hit “OK” Channels Allows you to select the format of the files being created by export. Xynergi Media Production Centre Page 298...
- Page 297 You can export the video straight from a project and automatically combine it with your choice of audio from a project. To do this, choose click on the File Menu and choose Export then Video This box pops up: Xynergi Media Production Centre Page 299...
- Page 298 Choose the video format into which you wish to export Step 2 Choose whether you want to export the whole project or a selected range NOTE to export as a Quicktime file you must have the latest version of Quicktime installed Xynergi Media Production Centre Page 300...
-
Page 299: Timecode Setup
The system sample rate is synchronised to its clock source. There are many choices, but normally you will use the SX20 as a sync source, and lock it to whichever sync signal your studio is running. Xynergi Media Production Centre Page 301... -
Page 300: Synchronization Indicators
This translates into producing the correct number of samples every second, which is called the Master Clock rate. This can be locked to a Digital Word Clock, a video signal, Xynergi Media Production Centre Page 302... - Page 301 Constellation-XT for the last time. You should make these choices at the very beginning of the Project, and then you may use any other combination that suits your purposes temporarily during the recording and editing process. Xynergi Media Production Centre Page 303...
-
Page 302: Machine Control
Pyxis – selecting Pyxis Track as one of your machines allows you to take it “offline” the same way as physical machines. See Editing with Machine Control on page 310 to see how this works. No Port – No port selected Xynergi Media Production Centre Page 304... - Page 303 When a machine (M1 or M2) with this setting is placed on-line, it means that DREAM II will control the transport of a 9-pin machine, but will chase the position of that machine in all transport modes. In this case the Config Window looks like this: Xynergi Media Production Centre Page 305...
- Page 304 Determines how the machine performs when searching for timecode. Each machine may perform better with either choice of algorithm. Bi-Directional Control When switched on, allows either the Master or the Slave to instigate transport commands (e.g. Play, Stop etc). Xynergi Media Production Centre Page 306...
- Page 305 The lower Run Lock checkbox provides the same option when recording. As for TC Master, but there is an individual choice of tracking algorithm for Play and Jog. Xynergi Media Production Centre Page 307...
- Page 306 Determines how many incorrect frames the system must see before it jumps to be in sync with the incoming timecode, or stops if no timecode is coming in. This allows the system to keep playing over timecode that has gaps. Xynergi Media Production Centre Page 308...
-
Page 307: Machine Control Indicators
Indicates the 9 Pin device is receiving a valid external sync reference. LTC Generator The LTC generator is an independent “machine” which can be controlled from the Smart Panel or from the work surface. Xynergi Media Production Centre Page 309... - Page 308 Press the M1 or M2 button on the Constellation surface. Click the M1, M2 or M3 button at the bottom of the Edit screen. Select one of the Enabled checkboxes on the Machine Control Smart Pane. Xynergi Media Production Centre Page 310...
- Page 309 Place M1 online – the transport will relocate to the video at the desired frame. Step 6 Press to paste the clip. <Enter> It is also possible to the clip before locating to the desired frame. COPY Xynergi Media Production Centre Page 311...