
CycleKart Tech Forum
Bugatti Type 32 build
Posted by JohnnyD


|
Topic Creator (OP)
Oct 3, 2013 09:06 PM
Joined 10 years ago
79 Posts
|
|
This might not be super helpful since the car is nearing completion but some of you have asked for a progress report so here is a new thread.
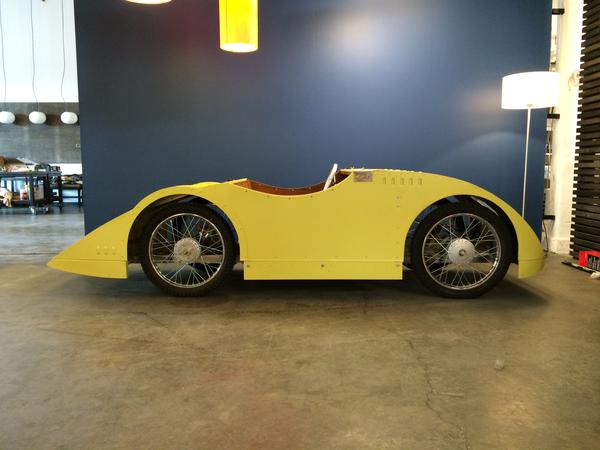
The bodywork is more or less done on my Bugatti. There are still details to attend to and plenty of bling to lay on but the big part is done. Today, some of my cronies helped me lift it off the stands it is has been on for a very, very long time. It was a huge relief to get it down on the floor! Firstly because it marked the relatively successful end of a very long, intense learning project. Secondly because the car shrunk when it hit the floor! It seemed to be getting bigger and bigger over the months on the stands... On the floor, it is low, sleek and petite. It was also a relief to feel how light it is.
The bodywork is 0.032 5052 aluminum. There isn't much structure - curved sheets joined by shrunk/ stretched strips and returns wherever I could work them in. The "rivets" are button head screws. No, I haven't counted them (yet). There is a 1/4" plywood box at the cockpit and the same plywood as the floor and as horizontal panels at the nose and tail. The paint is by rattle-can.
Guy Gadbois standing in as scale figure.
Attachments:
Bugatti side.JPG 32.3 KB
|
NateKartiste
Kat Sawyer
Bellingham, WA, USA
Sign in to contact
|
Oct 3, 2013 09:26 PM
Joined 11 years ago
245 Posts
|
|
Topic Creator (OP)
Oct 4, 2013 01:26 AM
Joined 10 years ago
79 Posts
|
|
|
Rhysn
Rhys Nolan
|
Oct 4, 2013 01:29 AM
Top Contributor
Joined 11 years ago
2,353 Posts
|
|
Oct 4, 2013 01:32 AM
Joined 11 years ago
127 Posts
|
|
 |
Oct 4, 2013 02:02 AM
Joined 11 years ago
509 Posts
|
Hi Johnny,
Well done very nice creation indeed, will you be buying one of these for the mantel piece??
http://www.ebay.com/itm/BRUMM-BM0468-BUGATTI-TIPO-32-TANK-1923-YELLOW-1-43-MODELLINO-DIE-CAST-MODEL-/310622667030?pt=Macchinine_e_Miniature&hash=item48528dc116
Well done very nice creation indeed, will you be buying one of these for the mantel piece??
http://www.ebay.com/itm/BRUMM-BM0468-BUGATTI-TIPO-32-TANK-1923-YELLOW-1-43-MODELLINO-DIE-CAST-MODEL-/310622667030?pt=Macchinine_e_Miniature&hash=item48528dc116
 |
Oct 4, 2013 07:51 AM
Joined 10 years ago
50 Posts
|
Super cool!
I have this crazy dream of building a full sized replica on a Triumph Spitfire chassis...
Maybe a steering wheel from here would be appropriate:
http://www.oldfoundry.com/catalog/product_info.php?products_id=101&osCsid=68fd0bf907fdd3a1b3e67fdf5fc57890
I have this crazy dream of building a full sized replica on a Triumph Spitfire chassis...
Maybe a steering wheel from here would be appropriate:
http://www.oldfoundry.com/catalog/product_info.php?products_id=101&osCsid=68fd0bf907fdd3a1b3e67fdf5fc57890
|
Oct 4, 2013 09:54 AM
Joined 10 years ago
4 Posts
|
|
1923bugattitype32 thanked twofoot for this post

alefoot
Derek W
|
Oct 4, 2013 01:40 PM
Joined 11 years ago
244 Posts
|
 phoenix, AZ, USA
Sign in to contact
1919 CycleKart Lightweight "A.V. Monocar"
1925 CycleKart Speedway Racer "Old Number 27" 1930 CycleKart German "The Boulevard Cruiser" 1937 CycleKart American "37 Studebaker Modified" |
Oct 4, 2013 04:55 PM
Top Contributor
Joined 11 years ago
949 Posts
|
I have to agree with Derek, mighty fine work! The scale looks really sweet and it does look better sitting on the ground. Very cool! That is a real work of art my friend!
D
Link to Cyclekart videos http://www.youtube.com/channel/UCh0MOBj4QLAYsl4XsfXHfWA/videos?flow=grid&sort=da&view=0
Link to Old #27 build photos
http://s1072.photobucket.com/user/DThomas1925/library/Old%2027%20Build%20photos?sort=3&page=1
Link to Monocar build photos
http://s1072.photobucket.com/user/DThomas1925/library/1919%20AV%20Monocar%20Build%20Photos?sort=3&page=1
Link to BMW Roadster build photos
http://s1072.photobucket.com/user/DThomas1925/library/1930%20BMW%203-15%20PS%20Wartburg%20Roadster%20build%20photos?sort=3&page=1
Link to my Facebook page
https://www.facebook.com/dennis.thomas.7564
 |
Oct 5, 2013 12:36 AM
Joined 10 years ago
161 Posts
|
|
Rhysn
Rhys Nolan
|
Oct 6, 2013 11:13 PM
Top Contributor
Joined 11 years ago
2,353 Posts
|
about 1 week and 4 days later...
|
Topic Creator (OP)
Oct 17, 2013 11:27 PM
Joined 10 years ago
79 Posts
|
|
Crawling toward the finish line...
With each CK I have built I have added more adjustability. Time for confession, sometimes that just makes a mess. I had some serious nastiness with the rear axle/ drive. The car has been underway for a long time in fits and starts with very long pauses between the fits. Longer than my memory unfortunately. It is always super tedious taking nylocks on and off so I tend to put everything together finger tight with plain nuts and do the lock nuts at the end. I dialed in my drive chain and did all the fiddly things one does to get the motor absolutely secure and the chain just exactly right WITH THE REAR AXLE AT A CASUAL ANGLE! My axle is in pillow blocks with oval holes. One side to the front the other to the back... oh boy, everything had to be redone with much cursing. The cramped conditions inside the bodywork just added to the joy. The Comet came apart several times for plate grinding. All good now. Smooth like butter. Anyway don't be embarrassed to tape notes to your work saying what you think you will remember later but won't.
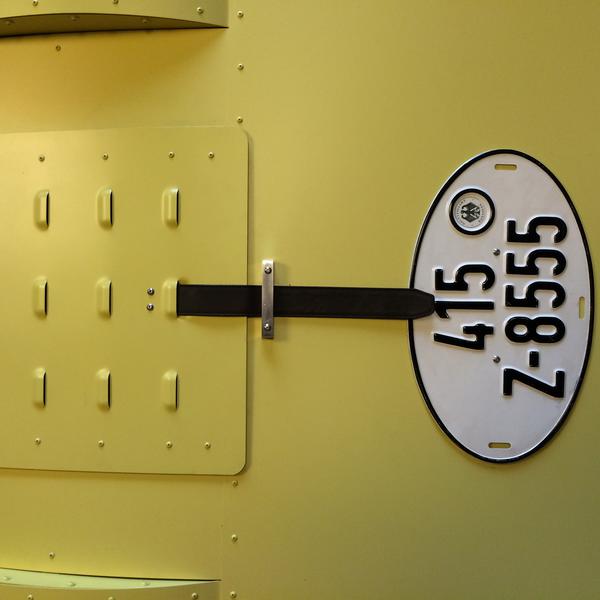
Some photos of progress. The engine access door is closed with a leather belt from the Salvation Army. Pull start comes up through the door. Closure is simple, fast and seems like it will work. Some of you might recognize the old German tourist plate of a VW bus. My inspiration car went to Austria after the GP Tours so a little teutonic bling seemed in order. The car was repainted yellow from the (at that time) powder-blue Bugatti racing colors when it went to Austria. With the multi stage Paris-Madrid road race coming up I made a lifting handle for the front. Of my cars, only my DeDion can whip around in the width of a road so doing a turnaround fast usually involves a helper grabbing the front and lifting. No where to do that with out disastrous results on the Bugatti. Hence the handle. My preference is no seat back cushion but rather a slopped smooth surface (I lean a little forward when I drive). Side to side support on the other hand is essential! I made an aluminum hip hugger for the Bugatti. I had a scrap of 1/8" plate aluminum. I bent it in the slip roller but not by rolling it but rather using the roller as a vise and just pushing really hard. The last shot is the cockpit. There is a small wind deflector. This was of course off center on the real car but that didn't make much sense for the CK version. The bonnet hold downs came off the Peugeot steering wheel I mangled and had to cut up after I rolled the car. It is always fun to redeploy an old piece of metal!
Fingers crossed, I hope to test drive this weekend.
With each CK I have built I have added more adjustability. Time for confession, sometimes that just makes a mess. I had some serious nastiness with the rear axle/ drive. The car has been underway for a long time in fits and starts with very long pauses between the fits. Longer than my memory unfortunately. It is always super tedious taking nylocks on and off so I tend to put everything together finger tight with plain nuts and do the lock nuts at the end. I dialed in my drive chain and did all the fiddly things one does to get the motor absolutely secure and the chain just exactly right WITH THE REAR AXLE AT A CASUAL ANGLE! My axle is in pillow blocks with oval holes. One side to the front the other to the back... oh boy, everything had to be redone with much cursing. The cramped conditions inside the bodywork just added to the joy. The Comet came apart several times for plate grinding. All good now. Smooth like butter. Anyway don't be embarrassed to tape notes to your work saying what you think you will remember later but won't.
Some photos of progress. The engine access door is closed with a leather belt from the Salvation Army. Pull start comes up through the door. Closure is simple, fast and seems like it will work. Some of you might recognize the old German tourist plate of a VW bus. My inspiration car went to Austria after the GP Tours so a little teutonic bling seemed in order. The car was repainted yellow from the (at that time) powder-blue Bugatti racing colors when it went to Austria. With the multi stage Paris-Madrid road race coming up I made a lifting handle for the front. Of my cars, only my DeDion can whip around in the width of a road so doing a turnaround fast usually involves a helper grabbing the front and lifting. No where to do that with out disastrous results on the Bugatti. Hence the handle. My preference is no seat back cushion but rather a slopped smooth surface (I lean a little forward when I drive). Side to side support on the other hand is essential! I made an aluminum hip hugger for the Bugatti. I had a scrap of 1/8" plate aluminum. I bent it in the slip roller but not by rolling it but rather using the roller as a vise and just pushing really hard. The last shot is the cockpit. There is a small wind deflector. This was of course off center on the real car but that didn't make much sense for the CK version. The bonnet hold downs came off the Peugeot steering wheel I mangled and had to cut up after I rolled the car. It is always fun to redeploy an old piece of metal!
Fingers crossed, I hope to test drive this weekend.
Attachments:
back.JPG 24.9 KB
|
|
Oct 18, 2013 07:38 AM
Joined 10 years ago
161 Posts
|
Man, the fit and finish on this car is second to none! It looks like even the simplest pieces have been lovingly massaged to perfection before even being considered for installation. So awesome.
I'll be stepping up my game today I guess. Dammit.
I'll be stepping up my game today I guess. Dammit.

TheGIantTribble
Bill A
Chelmsford, Essex, UK
Sign in to contact
|
Oct 18, 2013 10:03 AM
Joined 11 years ago
223 Posts
|
Forums 
Having trouble posting or changing forum settings?
Read the Forum Help (FAQ) or contact the webmaster
