I am waiting on beginning my next project so I figured I’d have time to get more familiar with some tools and techniques in the shop before I actually need to use them (and maybe hammer (wink, wink) out a couple small projects I’ve been wanting to do).
Sometime ago I had purchased a tenoning jig and mortising machine but, other than putting them together, I haven’t had much time to play around with, adjust, and learn the new tools.
Mortis and tenon joints are among the strongest wood joints and are used in all kinds of frame-type construction including chairs, tables, Chinese architecture (in which no fasteners or glue is used), and even old barn construction. This type of joinery dates back thousands of years and can be found in ancient boat building and furniture making – one source claims this type of joinery can be found as far back as 7,000 years.
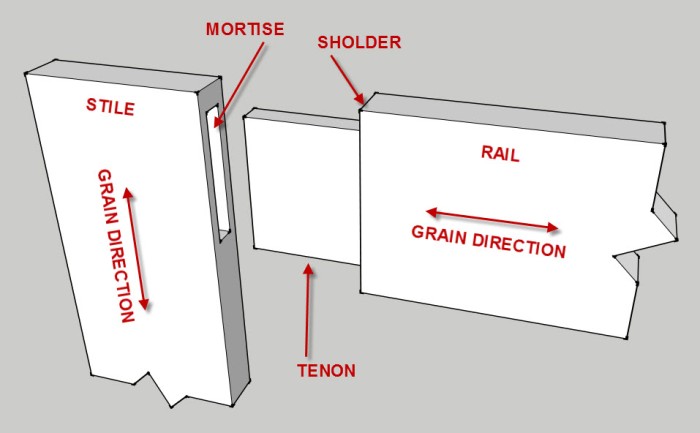
At the risk of getting too woodworking geeky here – mortise and tenon joinery also takes advantage of long grain to long grain wood direction. This grain direction is important to ensuring a good glue bond AND, if no glue is used (dowel or peg), a good strong joint.
one day
My dream is to one day create a signature piece (of sorts) that will be more than something my family and friends will ooh and ahh over, but something that I will ooh and ahh over as well (and maybe a couple of seasoned woodworkers). For now that piece would consist of some really nice species of wood and have some really nice joinery – not screws and nails and not metal hinges, modern drawer guides and the like. But instead, true “old school” craftsmanship – nothing but good joinery and glue (or maybe not glue, but dowels/pegs instead). Maybe something Sam Maloof inspired but with a Craftsman/Shaker style (which can be argued as completely different styles.. 🙂 ). But for that to happen I’m gonna need to brush up on some skills and probably purchase some new toys – 🙂
mortise & tenon 101
The pic below shows a mortise and tenon joint (separated for clarity). Note that the tenon will be inserted, and either glued or pegged into, the stile.
There are lost of blogs, articles, and videos out there describing woodworking joinery, and in particular mortise & tenon joinery, and I’ll leave further research and discovery up to you. There are also several, and sometimes conflicting, rules of thumb in regards to the size of the mortise and tenon components. For this purpose, I’m going to go with Marc Spagnuolo’s approach (of thewoodwhisper.com fame).
Popular Woodworking magazine also has a great article by Christopher Schwarz you can find [HERE] discussing proper mortise and tenon sizing.
According to Mr. Spagnulo, tenons should be cut approximately 1/2 the thickness of the board – so a 3/4″ board will have a 3/8″ tenon. Tenon length should be 4 to 5 times the thickness of the tenon – so the 3/4″ board, with a 3/8″ tenon width should be cut 1-1/2″ to 1-7/8″ long (there is also a rule regarding tenon lengths that might, by using this rule, extend to far). This is of course for what we call blind tenons and not through tenons in which the tenon would extend “through” the vertical stile.
For my practice pieces I’ll be cutting what is called integral tenons. Integral tenons mean that the tenon is cut from, and part of, the work piece. There are many other types of tenons, but for now, this is what I will be focusing on.
mortising machine
Creating a mortise in a piece of wood can be achieved by various methods. The oldest and most elementary method is by chisel and hammer – what our forefathers and the purest of us use, then there is the router method – where you would plunge a router bit into the wood to create the mortise, and finally there is the mortising machine method – which is what I’ll be doing here.
The particular make and model of mortising machine I have is not important for this blog. These machines can vary in price from a couple hundred dollars to couple thousand dollars – and can have all kinds of bells and whistles. The model I have is a pretty basic model – but I can certainly see where a bell here, or a whistle there might come in handy – or at least look cool.
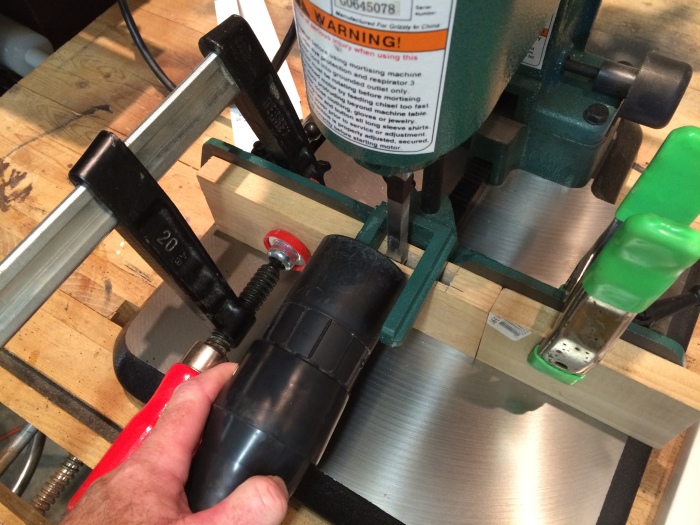
The photo below shows several things that I learned in cutting the mortise. The machine I have does have a pretty good fence, but there are models that have a clamping mechanism to secure the stock in place to the fence. I discovered that clamping the stock to the fence helped keep the stock from moving. I also show a stop block that I will register the stock against to determine the final hole placement. (I recently saw a video where the user drew a line on the base of his machine to indicate the starting point for the first cut and used a stop block to locate the board for his final cut – he did this to help with repeatability.)
square holes
I haven’t noted this yet, but for those who don’t know, a mortising machine drills square holes – really! It really is a glorified drill press in which the drill bit has a square chisel around the bit. As the bit drills the hole, the square chisel carves out the square hole around the round hole the bit is making. Drilling a square hole takes a bit of effort – more than a round hole would – since you are, in essence, drilling AND chiseling at the same time.
If you have done everything right you will end up with an elongated square hole – preferably in the stock where you want it, as wide as you want it, and as deep as you want it. The square hole will not be perfect – there will need to be some clean up with a chisel afterwards, but this is minimal. (This step reminds me that I need a good set of chisels.)
I followed the instructions on assembling my mortising machine to the letter and when I did, it had me disassemble part of the machine and add a riser block. I really didn’t know the implications of adding this block until I started cutting wood. Apparently adding this block adds the possibility of mortising thicker stock. This is great, unless you aren’t cutting thick stock – then you have to take the machine apart and remove the block – which is what I believe I’ll have to do… (I bet this is one of those bells or whistles I mentioned above.)
up next
Check out my next blog for the tenoning jig setup and use (mortise and tenon #2) to come.
cool links
Here are some of the many, many places you can find more info about mortise-and-tenon joinery.
- Tending to Mortise-and-Tenon Joints @ http://www.dummies.com
- Mortise and tenon woodworking joints @ http://www.craftsmanspace.com
- Motise-and-tenon @ http://www.wikipedia.com (I know, but it might be helpful)
- All about mortise-and-tenon joints @ http://www.finewoodworking.com
Aw heck! Just Google it…. 🙂


Pingback: mortise and tenon #2 | SouthernGrain | woodcraft & design by David Colley