Earlier posts on installing Windows 3.1 and 95 with VirtualBox have been consistently popular since I started this blog. This time the focus is on Windows 98, arguably the most popular version of Windows from a retro PC enthusiast prospective, particularly for gaming.
Based on personal observations I feel it comes down to a few reasons such as:
- relative ease of installation;
- generally runs earlier Windows and DOS games and applications without compatibility issues;
- was well supported by game developers into the 2000s;
- less irritable for power users compared to Windows ME (e.g. Windows ME brought further restrictions to DOS);
- people who only experienced PCs with Windows XP or later, generally can use with a minimal learning curve, who desire to run older games.
Unfortunately VirtualBox once again provides limited support for Windows 98, so the Guest Additions isn’t going to be of use. Also if the intent is gaming where DirectX and 3D acceleration is needed, I’d be more inclined to use PCem to emulate hardware from the era. Personally I built a Pentium III 800 MHz PC for Windows 98 gaming, and it’s brilliant for this. Despite all the mention of gaming, VirtualBox is better suited for applications.
Windows 98 saw two releases over its lifetime, the original RTM in June 1998, followed by the Second Edition (SE) in May 1999. Unless it’s out of curiosity, there’s not really a compelling reason to not go with SE. To understand the differences between the two, I’ll briefly go over the changes.
The RTM release brought together several bits and pieces that were made available for Windows 95 over time. Originally available separately or as part of Windows 95 OSR 2.5, Internet Explorer 4.0 and the Windows Desktop Update (e.g. shell enhancements such as the Quick Launch toolbar) were now integrated. Desktop Themes and utilities offered with Microsoft Plus! for Windows 95 were also added, USB support improved, and the introduction of DVD.
ACPI (Advanced Configuration & Power Interface) had also been introduced, though is typically disabled by default upon installation. ACPI provided an open standard that brought about transferring power management across from being dependent on the computer’s BIOS to the operating system itself. Installing Windows 98 with ACPI support is done by entering setup /p j at the DOS Command Prompt, otherwise it requires a registry change after installation.
The Second Edition included Internet Explorer 5.0, and Internet Connection Sharing. Internet Connection Sharing was to allow a small home or office network access the internet via a single PC. Useful at a time when only one PC could be physically connected using a dial-up modem. DirectX was updated from 5.2 to 6.1, introducing the DirectMusic API, whilst Direct3D now took advantage of Intel’s then-new Pentium III processors for 3D tasks. Fonts had also been updated, to accommodate the new Euro currency that came into effect across much of continental Europe. Otherwise the changes were subtle for improving stability and bug fixes.
For this guide you’ll need to have:
- Oracle VirtualBox installed
- Windows 98 Boot Disk (optional) Download
- CD or ISO image of Windows 98
- VBEMP Universal VESA Video Driver Download
Windows 98 also accepts the SciTech Display Doctor video driver that was used in my Windows 95 tutorial with VirtualBox. However, the one used here I prefer out of the two. Developed by Bearwindows and AnaPa Corporation as they call themselves, it’s a stable and no-frills driver, that can also be installed onto Windows 95 and ME. From experience this driver is lighter on resources and allows Windows 98 to shut down correctly. SciTech’s driver tends to cause the virtual machine to freeze up at the “Windows is shutting down” splash screen. The original source location is https://bearwindows.zcm.com.au/vbe9x.htm and is free for personal use. I simply copied the contents of their ZIP file in its entirety into an ISO image for ease of installation.
Here I’m using Oracle VirtualBox 5.2.18, though later upgraded to 5.2.20 on Windows 10.
Setting Up The Virtual Machine
Open up VirtualBox and select New. A Create Virtual Machine dialog box will appear allowing you to select which operating system it will be using for this virtual machine (VM). You may either select the Windows version, or type Windows 98 and the drop-down selection will automatically change. After this, select Next.
The following option now is to choose the amount of RAM. By default as Windows 98 had been selected, the recommended memory size is 64 MB. A historically accurate amount was typically in the range of 16 MB to 128 MB. For this, I went with 128 MB. Select Next.
Having 512 MB or above and Windows 98’s stability becomes flaky with varying results, thanks to memory management (i.e. VCache). This was inherited from Windows 95 and continued with Windows ME. For VirtualBox, I managed to successfully boot with 978 MB without workarounds. Once in gigabyte territory, Windows will simply crash upon start-up claiming there’s insufficient memory.
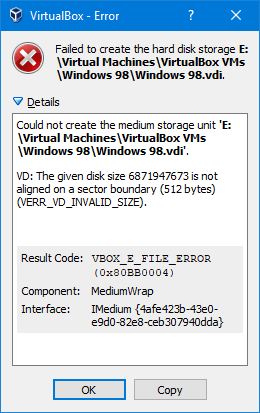
Now the option is regarding a hard disk for the VM. As we don’t have one yet, we will select the Create a virtual hard disk now option and choose Create. Again as we’ve chosen Windows 98, VirtualBox has suggested the recommended size of the hard disk to be 2 GB. Select VDI (VirtualBox Disk Image) and Dynamically allocated over the following couple of options before choosing the size of the hard disk.
 In 1998, hard disk drives peaked at 15 GB capacity. For a desktop PC, capacities of 4.3, 6.4, and 8.4 GB were most frequently seen.
Attempting to create a virtual hard disk at 6.4 GB, VirtualBox threw me an error about not being aligned on a sector boundary. Another attempt at an even 6 GB and it was fine. This quirk comes about from a misalignment with the sector size of your physical drive, in this case having 512-byte sectors. Alternatively repeating the process set at 6.4 GB on a different physical drive with 4 KiB (4,096-byte) sectors, and it was fine. To see whether my physical hard disks had 512- or 4,096-byte sectors, I went to check via Windows 10’s Command Prompt with administrator access. With the command fsutil fsinfo ntfsinfo d: to check Drive D, followed again by the other hard disks, the value for Bytes per Physical Cluster provided confirmation as to why the outcome was different on different drives. Depending on your setup you may not even see this error at all, but if you do, simply choosing a different size for your virtual hard disk is the way to circumvent this if you have no other hard disks to store your virtual machine.
Remaining settings to adjust for your virtual machine include:
- System > Acceleration tab > Deactivate the VT-x/AMD-V and Nested Paging
- Display > Scale Factor > Default is 100%, useful for enlarging low resolution output on our modern resolution displays if desired
- Audio > Audio Controller > Use Sound Blaster 16
- Network > Adapter 1 > Use Bridged Adapter and ensure it’s a PCNET-Fast III
- USB > Set the USB controller to USB 1.1 (USB 2.0 didn’t gain widespread adoption until Windows XP)
Whilst still in the Settings dialog box of your VM, you may mount the Windows 98 CD or ISO image before running it. Once done, select OK to close the dialog box.
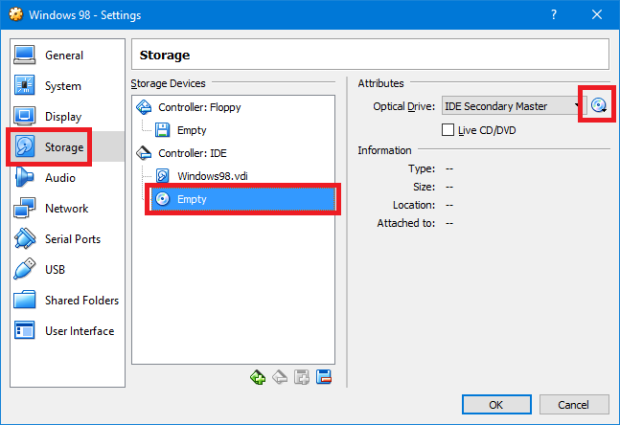
Mounting the Windows 98 CD. Use the Host Drive option for a physical disc.
Windows 98 Setup
Start your VM in VirtualBox, and shortly you should see the CD-ROM Startup Menu. Unlike Windows 95, there’s no need to use a floppy boot disk to begin installation. Either press 2 or use the arrow keys to highlight option 2 to proceed booting from the CD.

A second menu appears whether to proceed with Setup, or to boot into DOS with or without CD-ROM support. The first option is highlighted by default, so press Enter. Shortly you will see Windows 98 Setup.
At the Welcome to Setup screen, press Enter. Setup detects the virtual hard disk as having unallocated disk space, in this case the whole disk. Highlight Configure unallocated disk space (recommended) and press Enter. As the capacity is greater than 512 MB, Setup confirms if you wish to enable large disk support. Highlight Yes, enable large disk support and press Enter. In slightly technical terms, large disk support refers to the FAT32 file system, instead of the older FAT file system that had been in use since the 1980s.
Setup states that it will restart your computer, with mention to have the Windows 98 Boot Disk in your floppy disk drive. This actually isn’t required. Upon restart and choosing to boot from CD-ROM, select either one of the Start computer with/without CD-ROM support to access the DOS prompt. The Windows 98 Boot Disk is handy for reformatting the hard disk as FORMAT.COM is not provided when booting from CD.
At the DOS prompt appearing as A:\>, type fdisk and press Enter. The FDISK utility should load, and at first ask to enable large disk support as occurred in Setup. Press Y then Enter to proceed to the main menu. FDISK alerts you at the bottom of the screen that no partitions are set active. Press 2 then Enter to select Set active partition.
At the Set Active Partition screen, you’ll like see only one partition listed for this virtual machine – shown as C: 1. FDISK prompts to enter the partition’s designated number you wish to be active. Press 1 then Enter. The Status column updates to display the letter A to reflect this change. Press Esc repeatedly until you reach the DOS prompt again, then restart the VM.
Run through the startup menus to load Windows 98 Setup again. Now that there’s an active primary partition, Setup will commence formatting as needed for installation. When formatted has completed, press Enter to continue with performing a “routine check”, which is simply ScanDisk checking for any errors on the hard disk.
ScanDisk will complete, and Setup changes from text mode to the GUI portion of Setup. Here’s a series of screenshots through the steps up until this point.

Setting up for Windows 98 installation.
This stage of Setup is intuitive and easy to follow. Unlike Windows 95 Setup, hardware detection is left towards the end. At first, you’ll be prompted to confirm the location to install Windows. Click Next to install to the default, C:\WINDOWS.
Setup begins checking if a previous version of Windows exists, and the available disk space. A possible error to come up here is by using the inappropriate Windows 98 CD (i.e. using the retail Upgrade version on a blank hard disk, when it’s expecting to find either a previous Windows 3.1 or 95 installation).
You will now be greeted with four options on the installation type to proceed with. These options and their outcomes are virtually the same as what was on offer with Windows 95.
The four options are:
- Typical – As it’s named, this was the most common installation pathway that would have Windows 98 installed with many of its bells and whistles. We will go for this option.
- Portable – Similar to a Typical installation, though with some relatively minor changes that includes functionality concerning laptops, i.e. relating to power and battery settings.
- Compact – When disk space was tight, this option could be selected bypassing all the optional components such as games, accessories, etc. that may be installed with a Typical or Portable installation.
- Custom – Allows much greater tweaking of installation and configuration of Windows 98.
With Typical selected, click Next. Select Install the most common components (Recommended), and click Next. Otherwise feel free to customise (e.g. you may wish to include Desktop Themes). I personally tend to remove Online Services and Outlook Express.
Setup proceeds with confirming your computer’s name and the workgroup to be associated to for a server-less network. Enter a more descriptive name if desired, to replace the random alphanumeric characters. WORKGROUP is the default name for a workgroup, so only change this if your workgroup has a different name. Click Next.
You’ll be asked to confirm your location. Based on the country chosen, this would influence Windows 98’s Channel Guide that could appear floating on your Windows desktop. Select your country and click Next. As Setup is now ready to begin file transfer, click Next once more.
As files begin transferring over, a rundown of what’s in store with Windows 98 commences. Now is an opportunity to make yourself a coffee as it takes a few moments. After completion, Setup will display a countdown that it will restart your computer in 15 seconds, unless you hit the Restart Now button. When the VM restarts, you may also leave it alone and wait for the countdown to complete on the default option to boot from the hard disk.
The final stages of the Windows 98 Setup Wizard will appear, requesting your name, to accept the license agreement, and to enter your product key. Hardware detection follows, with yet another restart just as before. This time Setup will only prompt to confirm the date and time, but otherwise finishes off installation. Windows starts up and you’ll be prompted for a network password, due to having the VM set up to include a compatible network card. At this time, you may simply select Cancel. The network passwords here were only intended for accessing resources over your workgroup network, not to be confused with securing your user account. Windows begins to complete the Plug and Play process, by installing drivers for hardware components detected during Setup.
Setup is now complete and directs you to the Windows desktop, displaying the Welcome to Windows 98 window. Below is a continuation of screenshots up until this point. Remember to unmount the Windows 98 CD/ISO also.
Now it’s ready for some optimisations.

Windows 98 Setup to the desktop.
Configuring Video
By default, Windows 98 will appear at a low 640 x 480 resolution with 16 colours, using the basic VGA video driver. Installing the following video driver will allow up to 32-bit colour at a maximum 1,600 x 1,200 resolution – a lot easier on the eyes.
At the Windows desktop, right-click on My Computer and select Properties, to bring up the System Properties dialog box. Select the Device Manager tab to see a list of system components. Hit the plus sign beside Display adapters to expand, now showing Standard PCI Graphics Adapter (VGA). Select on this VGA video adapter, then click Properties to bring up the Properties dialog box. In the Standard PCI Graphics Adapter (VGA) Properties dialog box, select the Driver tab, then click Update Drivers. The Update Device Driver Wizard will appear.
With the wizard appearing, it states that it will search for an updated driver. Click Next. You’ll be asked to search or display a list of drivers to choose from. Select to display a list, and click Next. This option was typically for more advanced users who knew exactly what hardware they were installing.
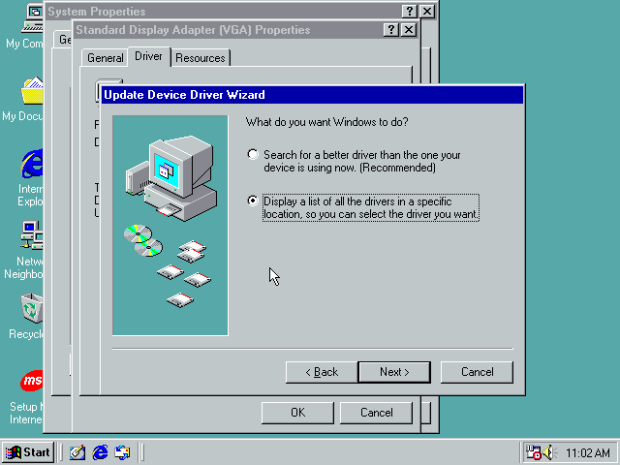
Update Device Driver Wizard.
You’ll be asked to select the manufacturer and model of your hardware device. Click Have Disk. The Install From Disk dialog box will appear. Now is the time to mount the ISO image of the VBEMP drivers. Once mounted, click Browse, select the CD drive, and direct yourself to the 032mb folder. Select VBEMP.INF and click OK to close this dialog box. The path to copy the files from has then updated. Click OK.
Based on the INF file selected, the Select Device dialog box shows the models of compatible hardware to choose from. However only VGA is an option. Select the radio button for Show all devices to expand the list. From this list, select the XGA model as shown below. Click OK.

Viewing all options from the VBEMP drivers.
Windows will warn you that the driver chosen wasn’t specifically for your piece of hardware, and therefore may not work correctly. Click Yes to proceed, then Next to begin installation. Click Finish once done, followed by Yes to restart the computer (VM).
Once restarted and back to the Windows desktop, the new display settings whilst still at 640 x 480 have now somewhat improved to 256-colour depth. Under the Display Properties within the Settings tab, you’ll know be able to significantly increase colour depth and resolution. Personally I set it to 32-bit colour with an oddball resolution of 1,152 x 864 as it comfortably fits within my 1080p monitor. Once you’ve made your selection, press OK. Windows will note that it will now resize your desktop. Click OK, then click Yes to keep the changes.
You should also find that the performance of the VM will be more responsive after this.

Windows 98 in glorious 32-bit colour.
Sound & Networking
As with Windows 95, Windows 98 detects the Sound Blaster 16 and PCNET-Fast III adapters for sound and networking respectively, out of the box so to speak. Unlike Windows 95 though the TCP/IP protocol is installed by default, so there’s no longer a need to change over from IPX/SPX. Internet connectivity should simply work. When the operating system was new, protocols such as IPX/SPX used on Novell networks, and Banyan Vines were losing prevalence.
All in all, nothing to do here!
You’re ready to go with using Windows 98!

These are great and easy instructions and you are a GODSEND but I am following it to a T and my thing keeps giving me a fatal error message after I click start virtual machine….do I need to have a windows 98 disc for this? Thanks!
LikeLike
Thanks for the compliment! What’s the fatal error message? Yes, you’ll need a Windows 98 CD, or an image of one (ISO).
LikeLike
Hello Josh. As Tara was saying this is just a glorious instructional to come across online! Very easy to understand. I’ve just dug up a couple very old games I adore yet they won’t run on my Windows 10.
Along those lines, similar to Tara, I’m getting an error message as well.
Following your instructions (aside from the fact that I always set my hard drive as fixed), when I go to press “start” the VM splash screen appears and then I get a blank screen reading “FATAL: No bootable medium found! System halted.” Could it be a bad ISO? Or maybe I just don’t know how to use them yet.
Thank you for your time and effort, and I hope to hear back soon.
LikeLike
Excellent!! This tutorial and Win 3.1 tutorial are just sublime!!
Thanks so much for your hard work, I’m really happy to have the Windows of my childhood installed now ♥
Cheers from Argentina!
LikeLiked by 2 people
Thank you for your helpful tutorial, I tried it with VirtualBox 6 which has a neat feature that you can bring files in as a virtual CD-ROM drive. But on the other hand, the VBEMP driver doesn’t seem to be working on 6.0. It says that the driver doesn’t fit and I need a different one. I will try it again, with 6.1 I think.
LikeLike
I have been trying for DAYS to get my VM working properly. This guide was all I needed! Thank you very much for your great work!
LikeLiked by 1 person
I stumbled upon this recently looking for apropriate network settings. I was pleasantly surprised to find the display drivers you offered as most of the guides out there claim SciTech Display Doctor is the ONLY way to get SVGA and your driver is much simpler and far less resource-heavy. I cannot thank you enough. I don’t know where you found it, but I’d like to add to the VOGONS archive, if I may.
LikeLiked by 1 person
Now this is epic
LikeLike
Josh, Wonderful instructions on loading Windows 98 into Virtual Box. I have it in and it looks like it is running. Now I am trying to load Moneycounts 9.0 into it off of a Thumb Drive which has all of my ministries accounting information. But I can’t seem to find a way to load it into the Windows 98 on Virtual Box. Can you help?
LikeLike
Hi John, thanks for the feedback. USB support on Windows 98 is a bit flaky and admittedly I tend to not bother using USB devices in a virtual machine. You’ll want to ensure your virtual machine has the USB 1.1 controller enabled. The thumb drive physically plugged into your PC should show up on the USB context menu along the bottom of the VirtualBox window beside the other hardware. Upon selection, Windows 98 should recognise that the thumb drive exists, however will bring up the Add New Hardware Wizard requesting drivers. The conundrum is that there is no drivers included with such a device unlike say a printer. As a workaround, there’s an unofficial patch that installs a mass storage USB device driver allowing the thumb drive to be detected and usable. The downside is that it typically keeps requesting for the same driver via the wizard every time you insert a different branded thumb drive, i.e. SanDisk, Imation, etc. The patch is available under the Windows 98 section of my Downloads page.
LikeLike
Josh…this is truly a great guide! I do have a few problems, however. When Win 98 staarts it asks for: vnetbios.vxd, vredir.vxe, and dfs.vxd, Then I get a window that says “unable to load the dynamic link library msnp32.dll. Then in looks for drivers in c:/windows/precopy where it does not fine them. I therefore cannot connect to the network or internet
Any suggestions?
Thanks Steve
LikeLike
Thanks Steve. Yes those files are used for placing Network Neighbourhood onto the desktop and networking at large. I would suggest reinstalling Client for Microsoft Networks via the Network control panel. It will source these files from the cab files included on the Windows 98 CD.
LikeLike
I struggled to get all the way through setting win98 se in the VB, just to find the video settings were useless for my old games. Your advice worked like a champ! I’m extremely grateful.
LikeLike
Thanks so much for this wonderful set of instructions to help us smoothly get through a most unintuitive process!
LikeLiked by 1 person
Thank you for this! I had to make one modification. Choosing the XGA video driver resulted in the screen being black after restart. Choosing the VGA driver Windows wanted me to works – I can still run in 8-, 16-, 24-, or 32-bit color, in a 4:3 ratio up to 1600×1200.
LikeLiked by 1 person
Thanks for the tuto!
I had a blackscreen too but restarting Virtualbox fixed it.
LikeLike
Thank you very much for this fantastic tutorial! What a wondeful job you did!
A quick note on the side: After selecting the XGA-Entry and a restart i got a black screen. Restart didn’t help so i had to setup the entire Virtual Box again.
I recommend adding a snapshot for the Virtual Box before changing the graphics-card-driver in your tutorial, so the user can reset and try again if XGA fails.
For me the driver “VBE Miniport – VGA (reserved by Microsoft)” worked and i was able to change resolution and color-depth.
LikeLike
Thank you for the compliment!
This is why I’m very specific at the start about the version of VirtualBox I was using to create the tutorial. The experience may not necessarily stay consistent, which had been something I noticed in particular with virtualising Windows NT 3.1.
LikeLike
This is great. I have managed to setup svga for windows98 finally. Thank you.
LikeLiked by 1 person
Thank you. I already had a Win98se VM, but needed to increase the size of the desktop, and these instructions were perfect for what I needed. Thanks for putting the video driver into an ISO for us all. 🙂
LikeLiked by 1 person
Bonsoir et MERCI, je me lance sur virtualBox 6.1.
Votre tuto pour Windows 98 est nickel, clair et fonctionne très bien.
Merci aussi pour les pilotes qui mon bien dépanner
LikeLiked by 1 person
Thanks, Josh, I was upset for being limited do 640 x 480 16 colors and your instructions worked perfectly fine on this. VBEMP Universal VESA Video Driver is great.
LikeLiked by 1 person
Thanks. The display driver worked great!
LikeLike
I have spent countless hour, days and nights, reading posts and trying this and that. Nothing worked. I was about to give up on Virtual Machines. But now I say THANK YOU, THANK YOU, THANK YOU. My win98 Virtual Machine is working great, and with 256 color, and great resolution. Your Post is accurate, easy to understand, and follow. Yours is the best.
LikeLiked by 1 person