What you need to follow this tutorial:
Your trusty Amiga 500 with Action Replay III cart.
Original game or SPS image
In this tutorial we’ll have a look at the protection on Total Recall from Ocean. I choose this one, because the TOSEC
cracks are all faulty.
I will not go much into the inner of the copylock, as there are plenty other tuts here, talking about that.
I have also tried keeping everything as simple as possible.
Protection is as follows:
encrypted bootblock
encrypted game loader
copylock routine checking for original disk in 1. driving level
copylock routine checking for original disk in 2. driving level
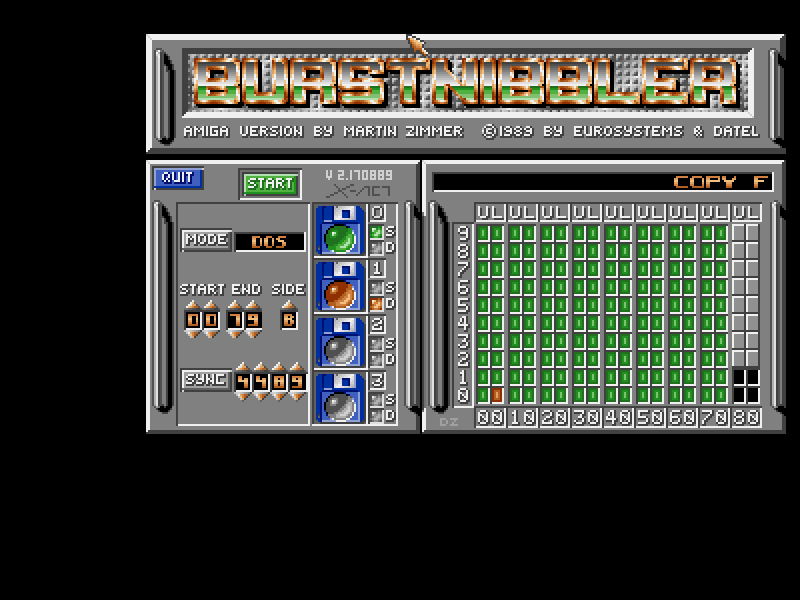
Start of by making a copy of the original two game disks, using Burstnibbler, builds into your AR3 cart. Enter AR and
type “burst” followed by return. As you can see on the below picture, the first disk holds and error on track 0,
lower side. Disk two has no errors. This tells us, that only disk one holds the disk protection.
Next logical step, is booting copy of disk one.
Not much happens, a white screen and then Amiga hangs… The protections are kicking in fast.
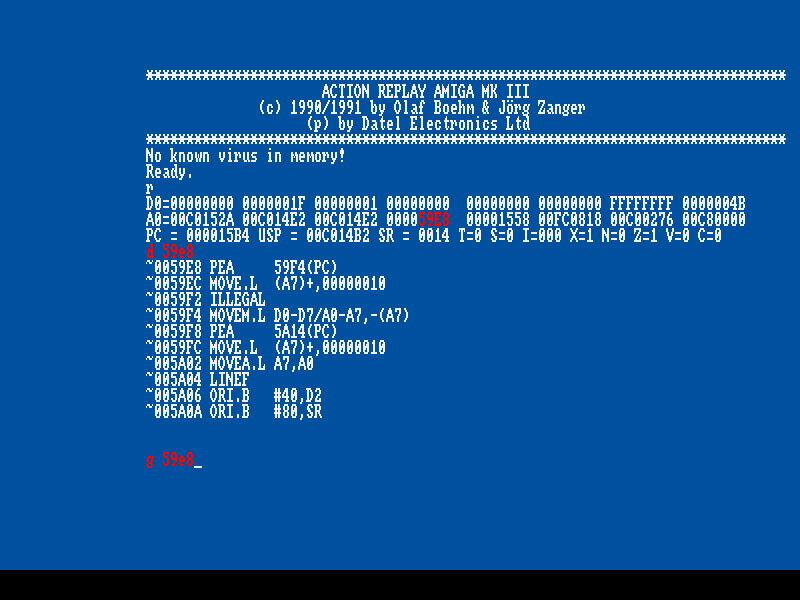
While you see the white screen, enter AR, press “d” and enter a few times, to disassemble the running
program:
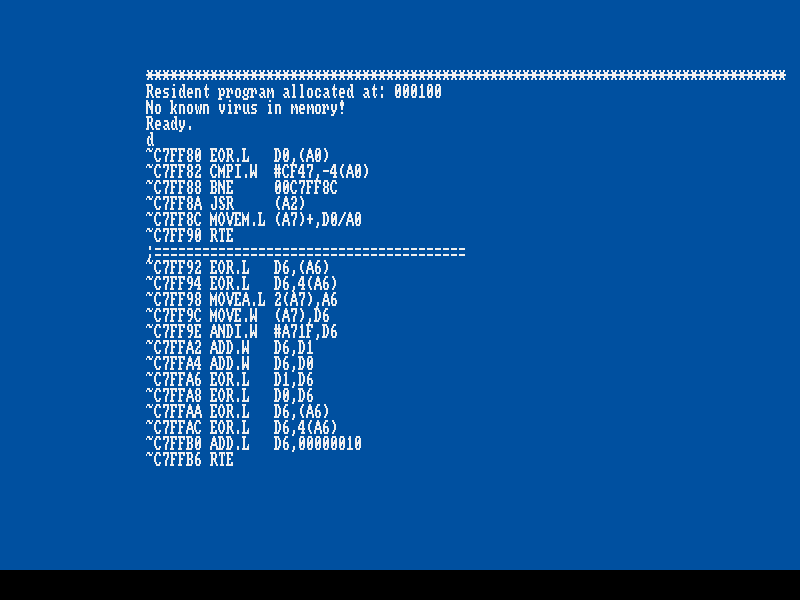
Now, that looks nice. From all the EOR.L stuff, it looks like a TVD – a copylock protection, trying to
decrypt something. But it has not much success; as it needs the data from the original disk 1, track 0,
lower side, to decrypt correctly.
A way to beat this, is letting the original disk decrypt the data and then we rip it when it’s decrypted.
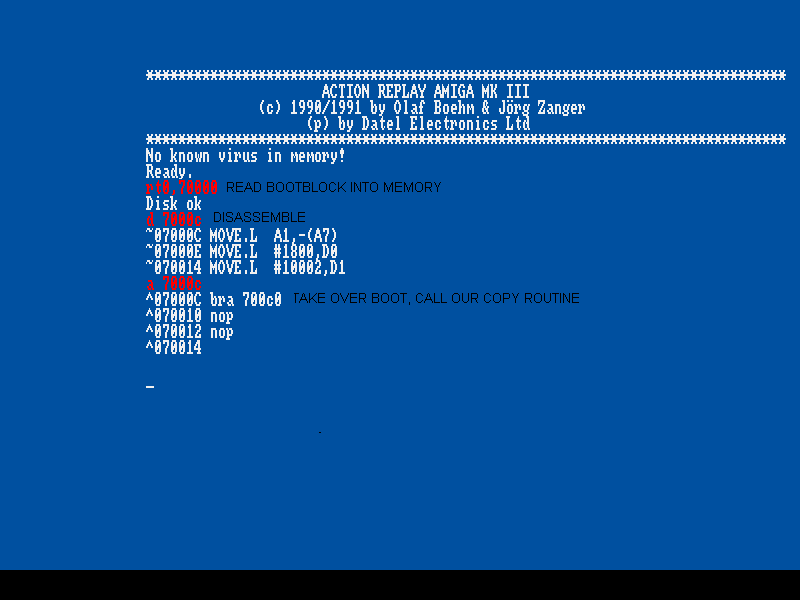
To get a little more information, let us have a look at the boot block. Read bootblock into memory and
disassemble: (marked with red)
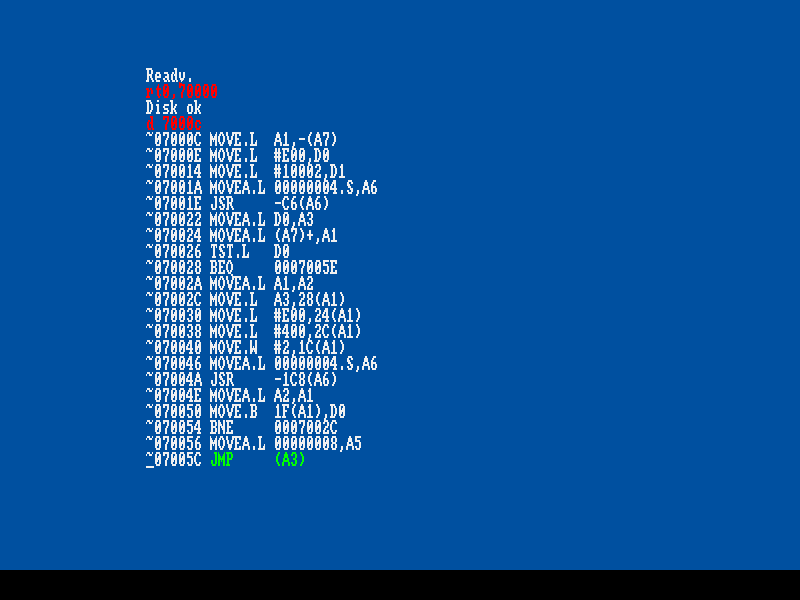
Start to disassemble at offset $C, because the first bytes of boot is header and checksum.
The instruction marked with green above is interesting, the JMP (A3) as it executes what boot loads into
memory. Lets change this to a loop and boot the disk:
Boot disk and enter AR when Amiga hangs in the loop. Boot was executing code, that reg A3 pointed to.
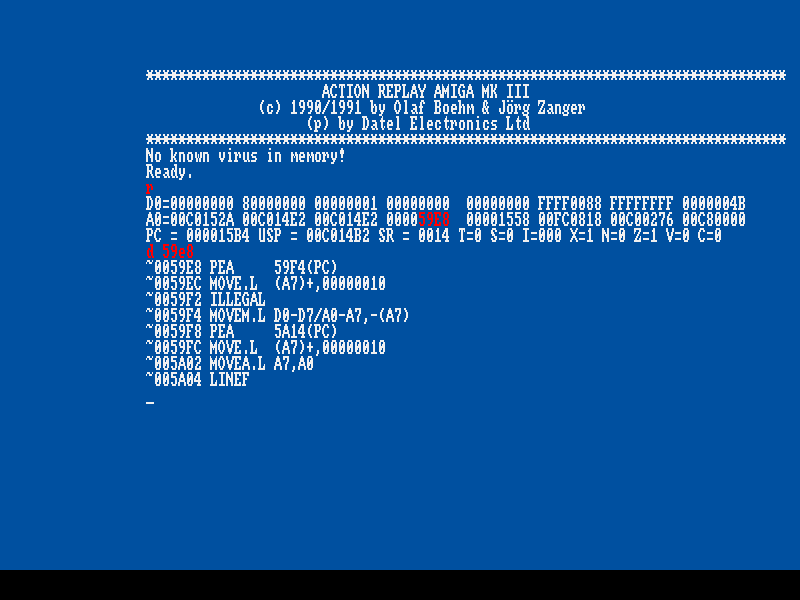
Let us have a look at what address A3 points to and disassemble a few lines of the code:
Type “r” + enter to see regs. Register A3 points to address 59e8. Disassemble address to see the code.
Above you’ll see a typical start of a copylock protection, with the PEA and ILLEGAL instructions.
The good thing is, that this type of encryption usually decrypts data over itself. This means, when the
encrypted code starts at address 59e8, the decrypted will also start at address 59e8.
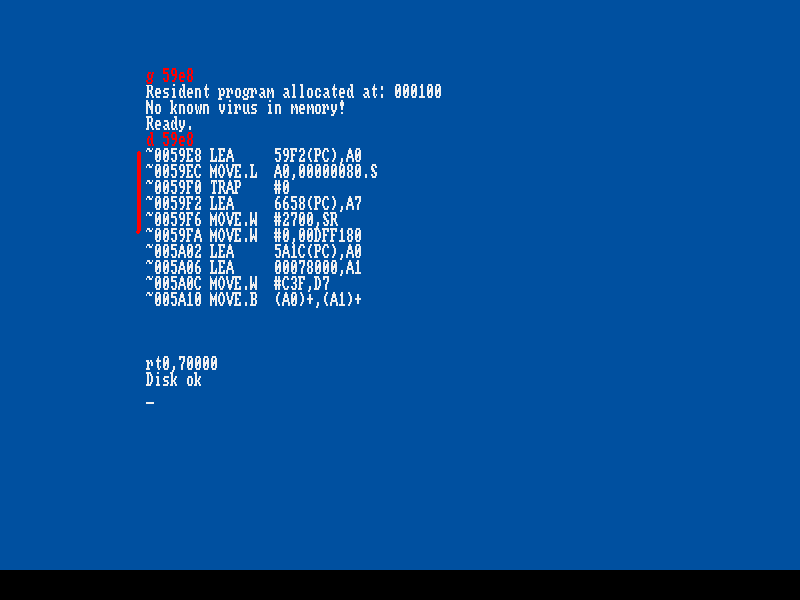
To decrypt code, simply insert your original disk 1 and execute code with “ g 59e8”. Wait a few secs,
Enter AR and have a look at address 59e8:
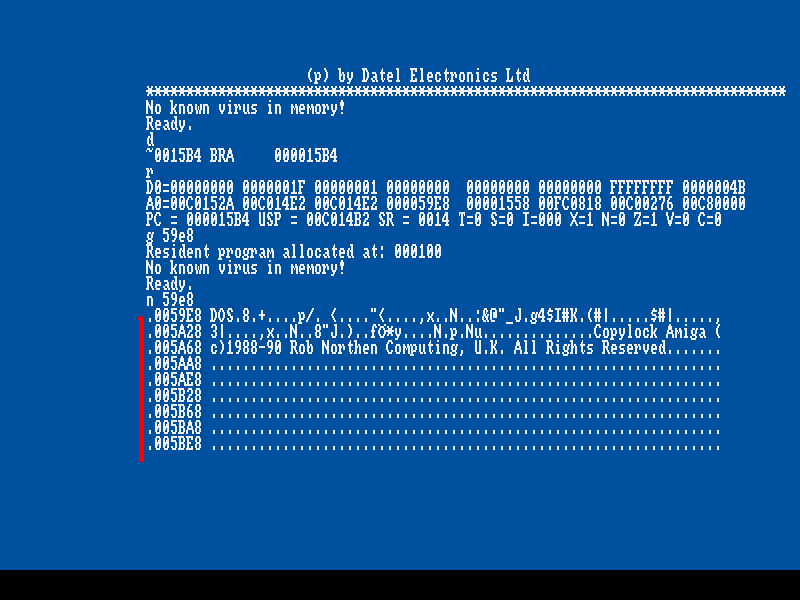
See memory with “n 59e8” + enter. Now, memory holds the decrypted code, and it seems to be a new
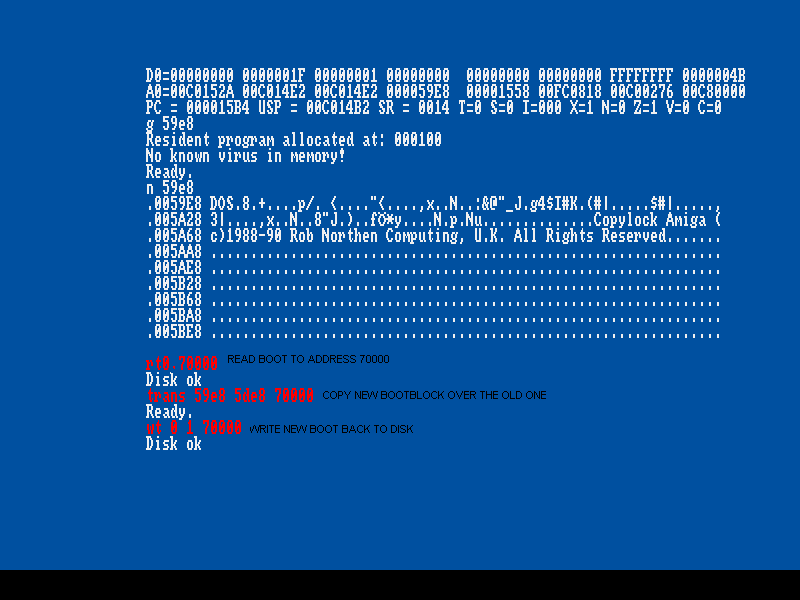
bootblock. Only logically thing, is to write this new boot to our copy of disk one. Insert copy of disk 1
read its boot to memory and copy new decrypted boot over the old one and write back:
Boot disk one and…. half success! Game now loads a few tracks, returns to track 0, hangs a few secs and
then crashes. Hmm, perhaps more encryption?
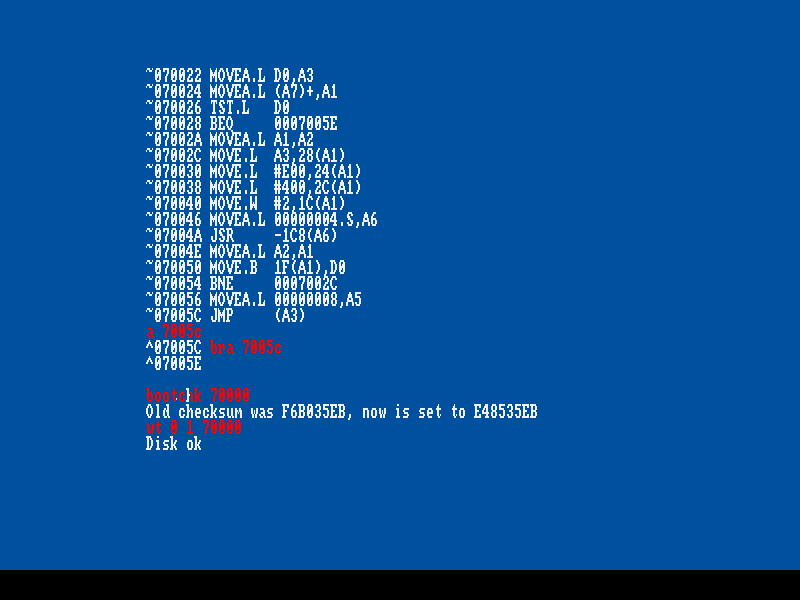
Let us have a look at the new boot block:
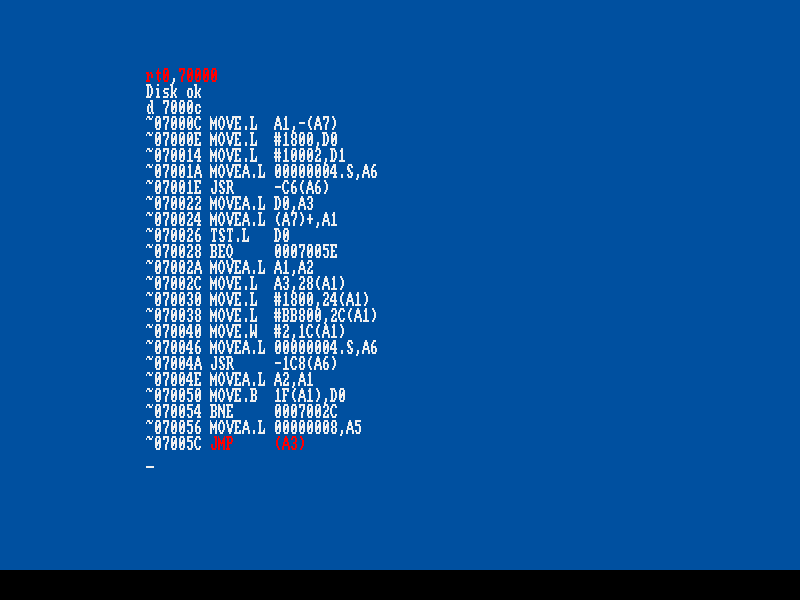
It looks very similar to the original one, it loads something and executes it with “ jmp (a3) “. The most noticeable
difference is offset $ 70038, this line points to where on disk to start loading data from, and this differs from
the original boot.
Again, replace the jmp with a loop routine, so we can see what it is loading. Have a look at the below
picture, marked with red:
Reboot, when Amiga hangs, enter AR & have a look at the regs., to see what A3 points to:
With the “r” command, you can see reg. A3, again points to address 59e8. Disassemble a few lines, and
you’ll see code, that looks familiar. Yes, yet again something encrypted. Decrypt the little thing,
by inserting original disk 1 and execute the code with “g 59e8”. A few secs after, screen turns black and
game starts to load. Enter AR and look at address 59e8:
Like magic, code has changed J
Unlike earlier, this data is not a new bootblock, but the game loader.
Now we must write this decrypted loader to copy of disk 1, overwriting the encrypted one, so game will
work without original disk. Before this can be done, we need to know how big the loader is, hence, how
much data that must be ripped and written over the encrypted loader. The bootblock can tell us the size,
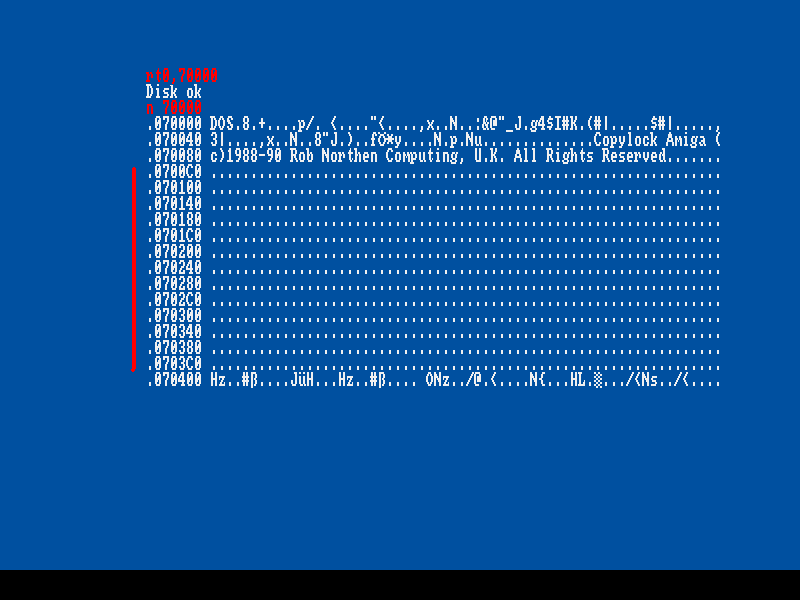
as it is loading the old encrypted loader. Read bootblock into memory: “ rt 0, 70000 “ and disassemble:
“ d 7000c “.:
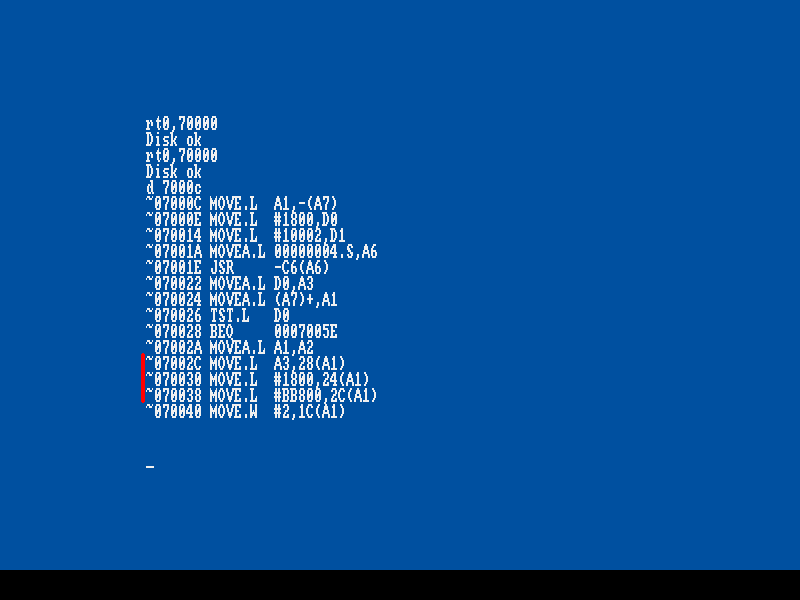
The interesting stuff is marked with red, in above picture. Offset $ 2c tells where in memory to load data to,
$ 30, the amount of data to load (it says $ 1800) – and this is what we are interested in, and last $ 38 tells
from where on disk to load from.
Decrypted loader starts in memory at address $ 59e8 and disk shows, that it is $ 1800 “big “.
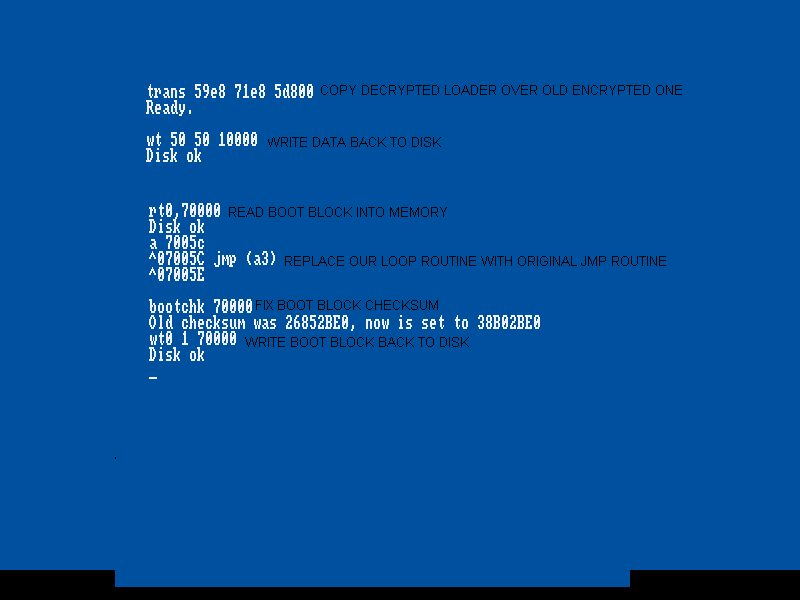
Rip memory from address $ 59e8 + $ 1800 = $ 71e8. But where on disk to put the decrypted
loader ?
Remember the encryption started with instruction “ pea xxx(pc) “ ? The HEX values for this are “ 48 7a “.
Simply read a large chump of disk into memory and search for value “ 48 7a “, the resulting address, is where
the encrypted loader starts. Follow the steps on below pic, to read disk & search for encrypted loader:
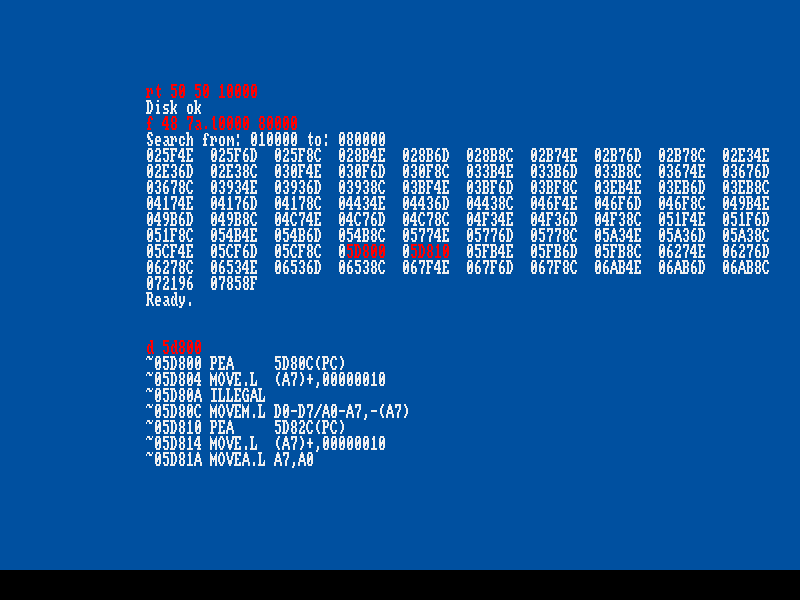
Puhh, lots of results! Most of them fake. How to know which is the real address ? Remember, that
encryption started with a “ pea xxx(pc) “ and $ 10 after, yet another “ pea xxx(pc) “. This only appears
once, at address $ 5d800 – 5d810. Simply copy the decrypted loader over the encrypted one, replace
the loop routine on boot block and write data and fixed boot back, to copy of disk 1.
See the instructions on the picture:
Reset and guess what:
Game starts to load… insert disk 2 as requested and you can start game at level one!
You have now cracked it like the TOSEC versions. The encryption is now completely removed, but there
are still two “ standard “ copylock routines remaining. These are executed just before entering the driving
levels.
When level 1 starts, enter AR, type “ m febd “ + enter and put value # 3 at this address, press enter and exit AR.
This will end level 1 or you can play through level 1. Game will ask for disk 1, load a little and then you hear
the drive grinding sound of the copylock kicking in. After a few secs, next level starts and everything looks
ok, but it isn’t!
If you shoot an enemy, the bullet will just go straight through and without and damage. You can not kill
the enemy. This is caused by the protection. We must find the copylock routine and find out, what it is doing.
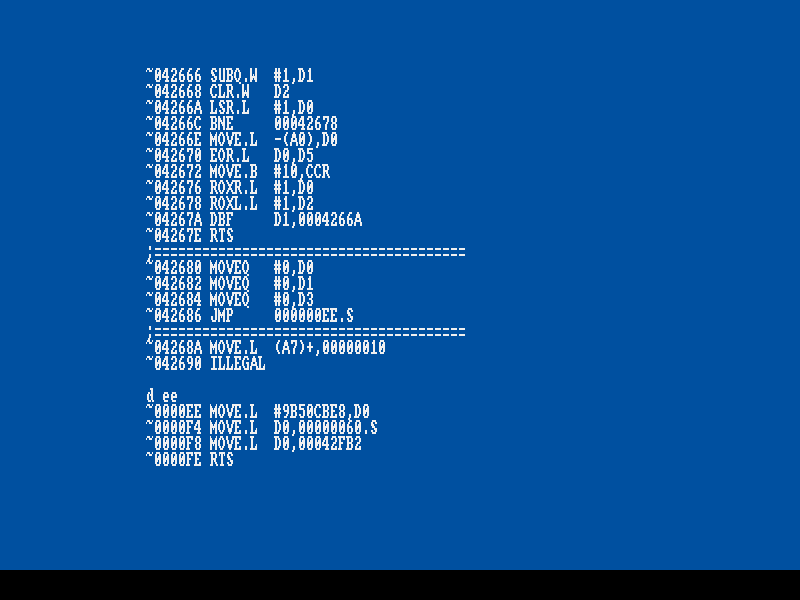
Enter AR and search for start of the routine: “ f 48 7a “.
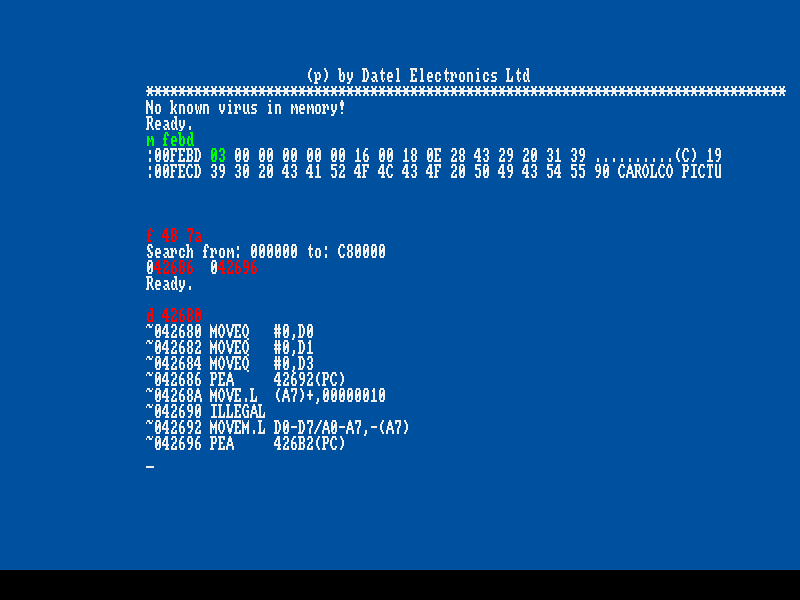
AR will return address $ 42686 & $ 42696, with $ 10 between. A sure hit! There is a few lines of code
before the “ pea xxxxxx(pc) “ , setting up regs., before code is run. This is the actual start of the protection.
Take good note of address $ 42686, as we need it later on, when making the crack. Next important step,
is finding end of the protection routine. Disassemble the code, and you’ll see a bunch of encrypted
nonsense and at address $ 42fa8 it seems to end. At address $ 42faa normal, understandable code starts.
This is where the protection ends. And look at the code, it is very interesting. It moves the contents of reg. do into
address $ 42fb2.
Insert a breakpoint at address $ 42fb0: “ bs 42fb0 “ and execute protection: “ g 42680 “. When
protection has run, AR will automatically pop up. (remember to do this with original disk 1)
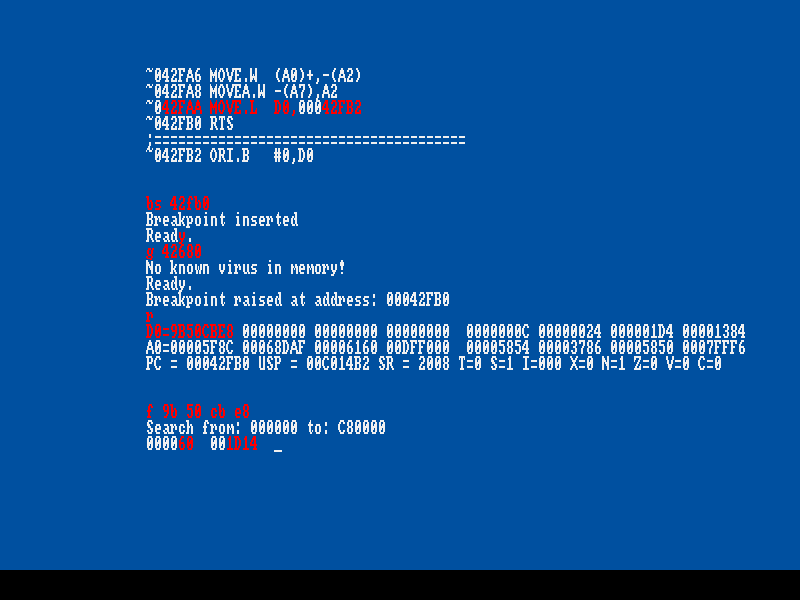
Contents of reg. d0 was moved into a memory address, so this contents might be interesting. Have a look
at regs. with “ r “ + enter. Sure enough, reg. d0 has changed from value 0 to 9b50cbe8. And then this
value is moved into address $ 42fb2. Take note of this, it is of course important!
Protection might do something fun, like returning the d0 key at a memory address, so do a search for
The key: “ f 9b 50 cb e8 “. Yep, two addresses are returned, $ 60 and $ 1d14.
$ 60 is very low, so this is probably protection returning the key here, take note. But address $ 1d14 might
be part of the game code, try disassemble memory area:
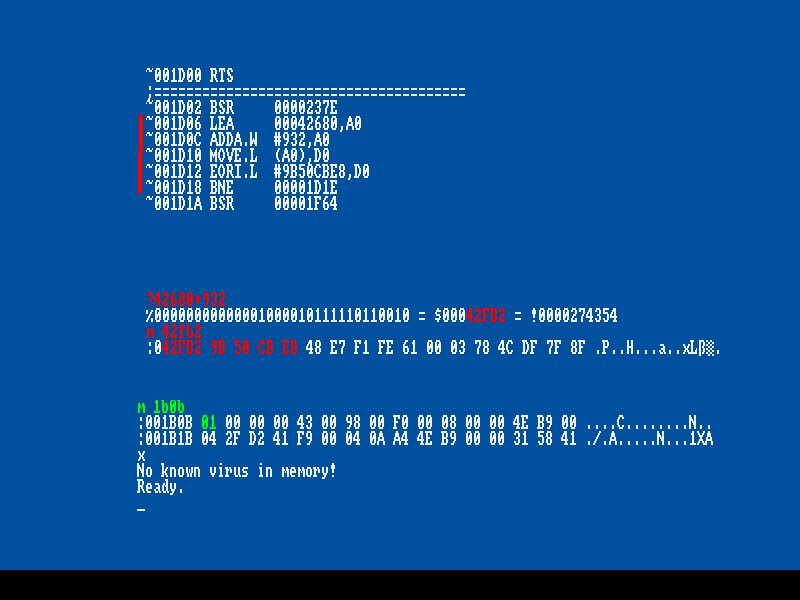
Sure, it is game code. This is where the game checks if copylock has returned the correct values.
Address $ 1d06 put value # 42680 in reg. a0. Then address $ 1d0c adds value # 932 to a0.
Which means 42680+932 = 42fb2. Value # 42fb2, occurred in end of the protection, where reg. d0
was moved into this memory location. And sure enough, the value or key, is stored here.
Address $ 1d10 moves the contents of the address a0 points to, into reg. d0. At this point, the key is now
back in reg. d0. Then address $ 1d12 xor the key with it self, the result is 0. Address $1d18 passes because
result is 0 and code continues at address $ 1d1a.
If the protection did not pass, the value of d0 would now be 0 and when $ 1d12 xor key with 0, the result
would be 9b 50 cb e8, this would make the branch at $ 1d18 true, and some game code would be skipped.
And then you can not kill enemy!
To sum up the important: to crack this, we must:
return key in reg. d0
return key at address $ 60 & 42fb2
Now, continue to the next levels, to look for more protections. Either reboot with original disks and continue
play, or put value # 1 at address $ 1b0b, to skip current level, see picture above, marked with green.
Next level loads, with disk 2 – that is not protected, so no copylock here. Enter AR put value # 3 at address
$ febd, to skip level. Next level also loads from disk 2. Again, put value # 3 at $ febd to skip level.
Now game asks for disk 1, and when next level loads, a drive grinding sound appears, before level appears.
Again, this is a “ shooting car “ level & you can not shoot enemy. The protection works exactly the same way
on this level as on the other car level. I will not go deeply through the stuff again, follow the pictures:
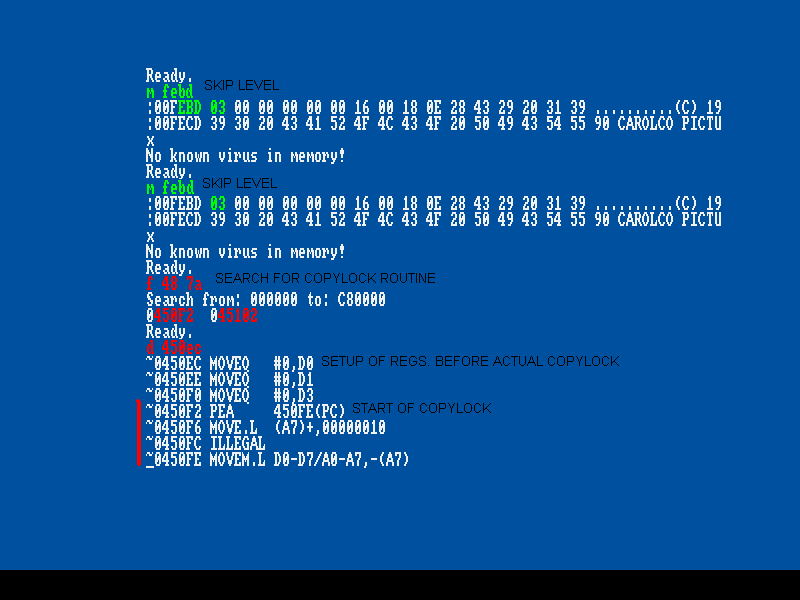
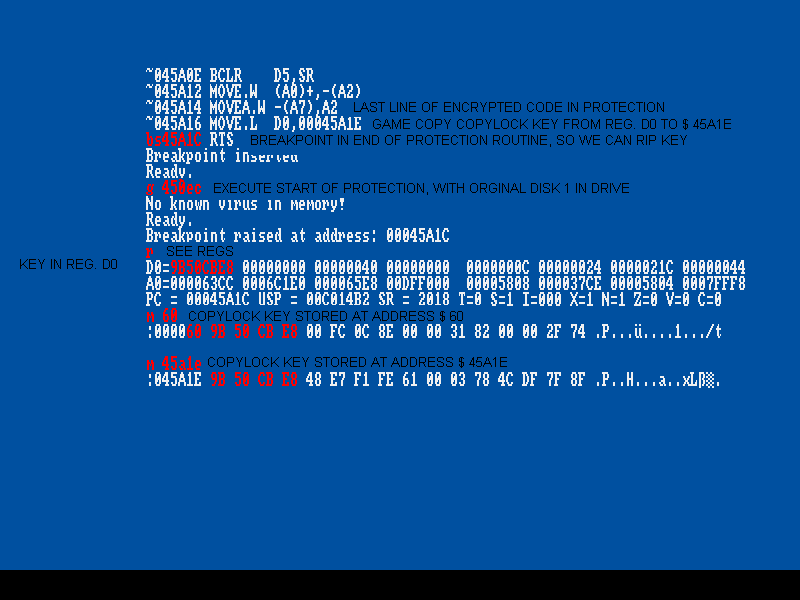
For this level, the three places to return copylock key is:
reg. d0
address $ 60 & $ 45a1e
This is the fourth and last protection in the game. Rest of levels is not protected.
Next logically step would be, reading disk into memory and find the two copylocks overwrite them with
a crack routine. If we read disk into to memory and search for the copylocks we will find…. NOTHING!
This part of the game code is crunched ( compacted ), to save disk space (and perhaps to piss of crackers).
There are to ways; rip crunched files, decrunch them, crack them re-crunch them. Or ( what we will do )
find the decrunch routine and take over game after files has been decrunched, patch them, and return to game.
We need to find the decruncher for the car levels. Therefore, reboot game & skip first level. When game has
finished loading the car level, a black screen appears and disk drive has stopped seeking. Game is now
decrunching data, enter AR and have a look at memory:
We enter program around address 16b8. Have a look at memory area with “ n “ command. What to
look for ? Well, many data crunchers uses a header in the start of the crunched data. There is used
two crunchers in this game; Pack Ice & ByteKiller data.
Examples;
“RNC” – Propack (this is the best cruncher and I kill you, if you use any other)
“PP20” – PowerPacker
“ IMP!” – File Imploder
“CrM!” – Crunchmania
“ S404” – StoneCracker
“ Ice!” – Pack Ice (Atari) – think Amiga packer Iam Packer also uses this ID – but not sure
Etc, there are LOTS more
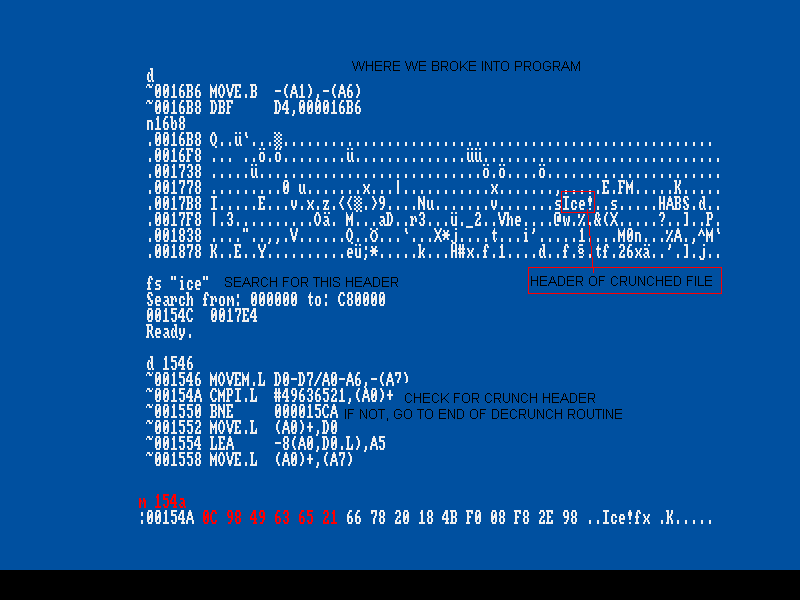
Around address $ 1700, you’ll see txt “ Ice! “, this indicates we are near to something. Try search memory
for the txt string, see above pic. AR returns address $ 154c & 17e4. Perhaps 154c is part of the decruncher
and $ 17e4 is start of crunched file.. ?
Disassemble around address 154c. You’ll see start of a routine at address $ 1546, next line is checking for the
txt “ Ice!”. This is for sure the decruncher.
What if we hooked a jump to a crack patch, located in a unused memory area, in end of the decruncher..
This way, game will always call our patch, each time it has decrunched a file. In our patch, we can check if
one of the copylocks appears in memory. If it does, patch cracks it and return to game. If it does not, it just returns
to game.
Take note of the HEX values at address $ 154a, start of the decruncher (these values are unique), see above pic.
With these values, we can find the decruncher on game disk and hook a call in it, to our patch.
With copy of disk 1 in drive, read a chump of it; “ rt 0 50 10000 “.
Search for the decruncher; “ f 0c 98 49 63 65 21,10000 80000 “. AR only returns one address; $ 1334a.
Disassemble this address and few lines of code down, at $ 13350, you’ll see a branch to end of the
decruncher, it is address $ 133ca. Replace code here, with a “ JMP $ C0.S “ and take note of the code
we overwrite, as it must be restored in our patch.
Then you ask yourself: “ from where did he get address $ c0 as a location for crack patch ? “
In general, address $ c0 – $ 400 is not touched, in general!!. To find out, fill the memory area with a known
value, ex. “ FF “, play through whole game and see it memory area has changed in end of game. If, not
you got a safe place for a patch.
And for last, write data back; “ WT 0 50 10000 “.
So, each time game has decrunched a file, it will call address $ c0. Now, we must place some code at this
address, each time game starts. This means, our crack patch must be located on disk 1 and then at boot,
copied to address $ c0. Where on disk to put patch ? – I recalling, seeing some free space at boot block!
Read in boot and have a look:
Plenty of space from offset $ c0 – 400. Disassemble the first part of boot, to find a place to take over &
insert a call to a routine, that will copy a crack patch to address $ c0:
We’ll take over boot in its very beginning; offset $ c. Insert a “ BRA offset $ c0 “ here. And inset two
“ nop “, to make code add up again, see above picture. At offset $ c0, code the copy routine and the actual
crack patch, that will be copied to address $ c0. Explained in picture:
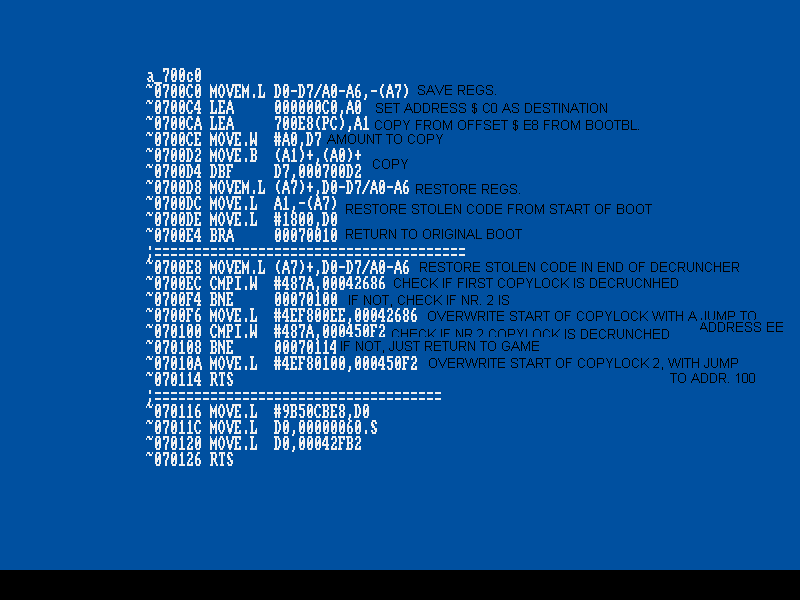
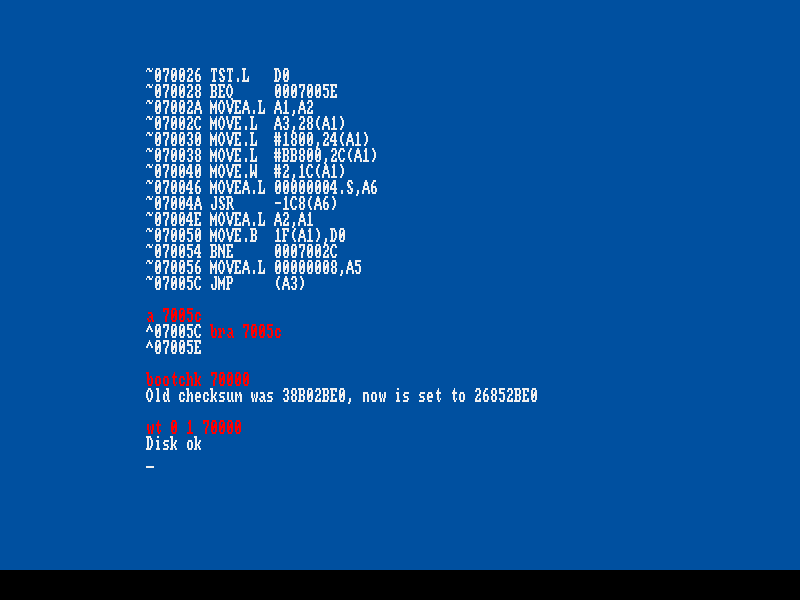
After coding above, correct bootblock checksum; “ bootchk 70000 “ and write back; “ wt 0 1 70000 “.
Reboot and skip to first driving level. You can now actually kill enemy! Have a look at start of the
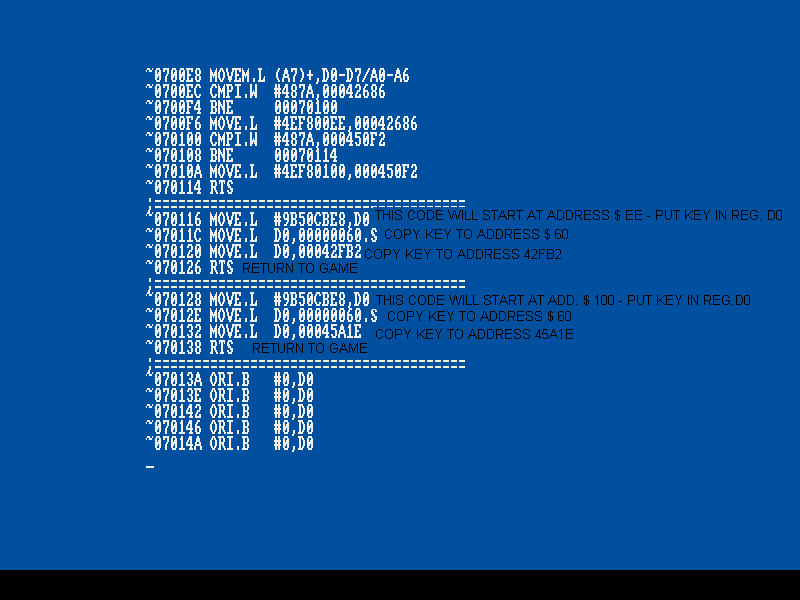
Copylock:
Start of protection will now jump to address $ ee, where copylock key is returned all the correct places.
Same thing will happen in second driving level.
I have attached the cracked disk 1, to be downloaded. Just make a copy of disk 2 and you are good to go.
Rob
This is an absolutely great cracking tutorial. I’m even wondering if the whdload slave does as good
as this !
ROB, welcome back my friend, happy to see you again !
Denis
Welcome back ROB! 😉
Nice, a little bit more work than the average Copylock crack 🙂